Bird scare tape works by exploiting two things birds hate: unpredictable flashing light and sudden metallic noise. When you hang it correctly, it genuinely keeps nuisance birds away from gardens, patios, rooftops, pools, and solar panels. When you hang it wrong, birds ignore it within a week. This guide tells you exactly what to buy, where to put it, how to install it, and what to do when it stops working.
Bird Scare Tape How to Use: Install, Placement, and Tips

Marcus Weatherby
15 Apr 2026
What bird scare tape actually is and when it works
Bird scare tape is a narrow strip of highly reflective mylar film, usually holographically printed, that you string between supports outdoors. As wind moves it, the tape flashes blinding light in unpredictable directions and produces a metallic crackling sound. Both effects are alien and alarming to birds, which triggers an instinctive flee response. Products like Irri-Tape go a step further with a holographic owl-eye-like pattern printed on the surface, adding a visual predator cue on top of the reflective effect.
It works best in open or semi-open areas where wind can move the tape freely and sunlight can hit the surface. Good use cases include gardens and crop rows, patios and decks, pool surrounds, roof edges, window ledges prone to bird strikes, and the perimeters of solar panel arrays. It also helps reduce window strike risk by disrupting the mirror-like reflection that confuses birds into flying toward glass.
Be honest about the limitations before you buy. Tape is a visual and acoustic scare, not a physical barrier. It works well on birds that are not heavily habituated to a site and in situations where the birds have somewhere else to go. Heavily urbanized pigeons nesting in a confined space, or birds with no alternative food source nearby, are much harder to move with tape alone. Transport Canada's wildlife research also notes that habituation can happen quickly if the tape is left in place too long without change, which is a key point we'll come back to.
Choosing the right tape and planning placement before you buy
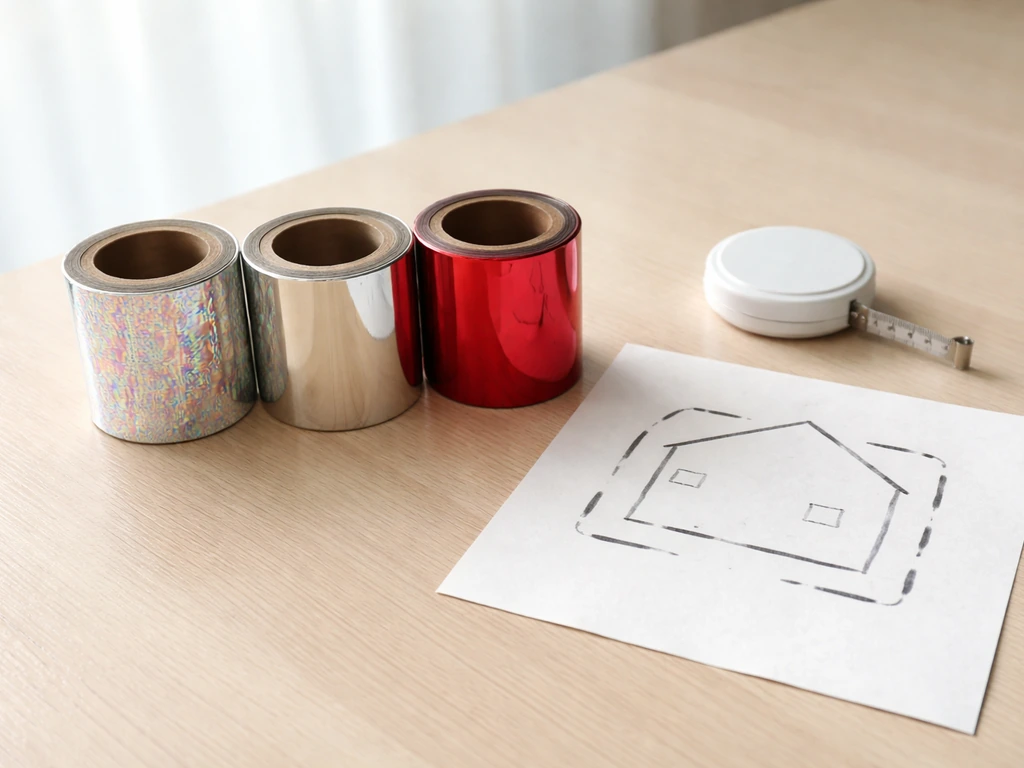
Most bird scare tape on the market is 1/2-inch to 2-inch wide polyester or mylar film in silver, red, or holographic finishes. For general residential use, holographic tape is the best choice because it produces multiple spectral colors as it twists, not just a single reflection. If you want a deeper dive into the differences between product types, how to use bird repellent tape covers the material and finish options in more detail.
When planning how much tape to buy, measure the total linear footage of the area you want to protect and add about 25% for sag, twisting, and tying off at the ends. For perimeter protection, the research from Dolbeer et al. suggests spacing tape lines about 3 meters (roughly 10 feet) apart is more effective than wider spacing. A Bay of Quinte Watershed report on crop protection options similarly evaluated Bird Scaring Reflective Tape at different spacing intervals, including 3, 5, and 7 m blank" rel="noopener noreferrer">spacing tape lines about 3 meters apart is more effective. At 20-to-25-foot intervals around the perimeter is a workable minimum for larger areas.
Sun and wind exposure matter enormously. A shaded, windless spot will reduce the tape to a limp, silent strip that birds learn to ignore fast. If your problem area is shaded, you may need to position supports so the tape extends out into a sunnier zone, or pair the tape with a different deterrent type. Check the typical wind direction in your yard and orient your tape runs so they cross the wind, not run parallel to it. That way, wind hits the tape broadside and gets maximum flutter and sound out of every strip.
Step-by-step installation
Measuring and cutting

Measure the distance between your two anchor points, then add 15 to 20 percent extra length. That extra length is what allows you to create the spiral twist that makes the tape work. If you are cutting strips for a spot like a porch railing or a single window ledge, Nite Guard's guidance suggests cutting strips around 30 inches long, using five or six strips per location. For longer runs across a garden row or roofline, cut to the measured span plus overage.
Cleaning and prepping anchor points
Wipe down posts, railings, or any surface you are tying to. If you are using adhesive clips or staples on a wood surface, make sure it is dry. One important note from Nite Guard's safety instructions: mylar is an electrical conductor, so do not install tape near power lines, electrical fences, pumps, or generators. Keep tape well clear of any live electrical equipment.
Attaching, twisting, and tensioning
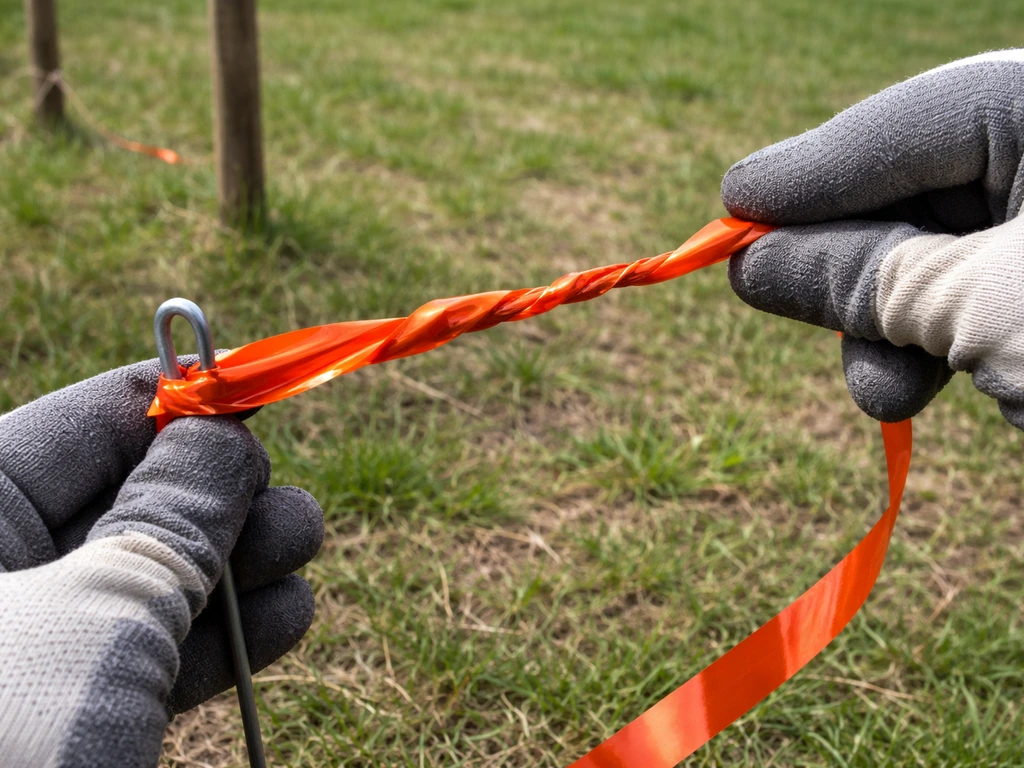
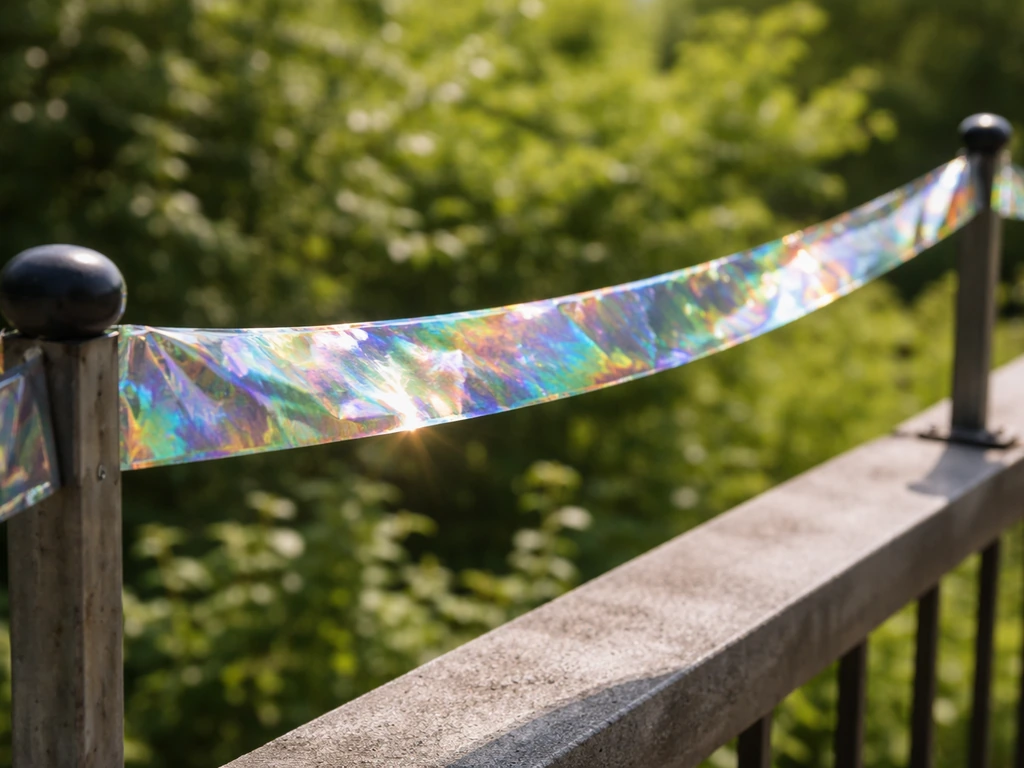
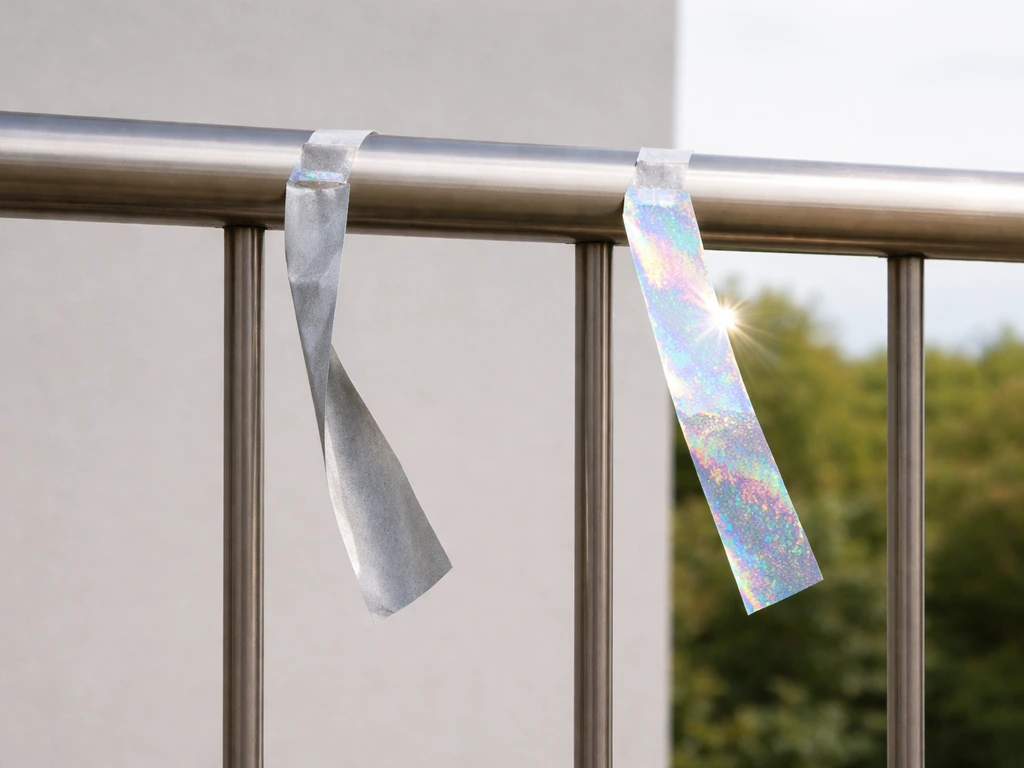
Tie one end of the tape to your first anchor point securely. Then, before tying the other end, twist the tape along its length to create three or four full spirals. This is the step most beginners skip, and it is the most important one. A flat strip of tape can end up with its reflective side facing away from the sun or lying still in low wind. A twisted strip rotates continuously, guaranteeing the reflective surface flashes in multiple directions regardless of which way the wind is blowing.
Once the spirals are in, tie off the second end with just enough tension to remove the slack, but not so tight that you flatten out the twist. The tape should hang with a slight natural sag of about half a meter to one meter at the midpoint on longer runs. Do not staple the tape flat against a surface. Stapling kills the movement and makes the tape useless. If you need guidance on the specifics of securing the tape to different surface types, how to hang bird repellent tape walks through anchor options in detail.
Best spots, heights, and spacing for common areas
Height is one of the most common mistakes. Tape hung too low does not catch wind or sun effectively, and birds can fly above it entirely. As a general rule, position tape about six to seven feet above the area you are protecting. For garden and crop applications, the tape should be elevated roughly three feet above the crop canopy. If you are protecting a patio or pool, string the tape at or above head height so it moves freely in the air above the space.
| Location | Recommended Height | Spacing Between Lines/Strips | Notes |
|---|---|---|---|
| Garden / crop rows | 3 ft above crop canopy | ~10 ft (3 m) apart | Orient runs to cross prevailing wind |
| Patio / deck | 6–7 ft above deck surface | Perimeter plus center if wide | Use multiple strips at posts and edges |
| Roof edge / ledge | At or just above parapet height | Every 20–25 ft along edge | Secure to chimney, vent pipes, or screwed hooks |
| Pool surround | 6–7 ft above water level | Perimeter posts at 20–25 ft intervals | Mylar near water OK; keep away from pump/electrical |
| Window (strike prevention) | Full window width at glass level | One strip per window pane or every 4 inches vertically | Hang vertically as well as horizontally |
| Solar panel perimeter | At panel height or just above | Along all four edges | Check panel warranty before attaching to frame |
For larger open areas, the maypole arrangement works well: sink a central pole six to eight feet tall, then run eight to ten lengths of tape outward from the top like spokes to low anchor points around the perimeter. The tape moves in all directions with any wind shift and covers a wide radius. This setup is particularly good for protecting vegetable beds, blueberry bushes, or small orchards.
If you are hanging tape from posts rather than poles, how to hang reflective bird tape has specific guidance on post types and fixing methods that hold up through rain and wind without the tape slipping down over time.
How long it takes to work and when to swap things around
In most residential settings with moderate bird pressure, you should see a noticeable reduction in bird visits within two to three days of correct installation. If birds are still landing in the area after a week, either the placement is wrong (height, wind exposure, or spacing) or the birds are already too habituated to the site to be scared by a visual-only deterrent.
Habituation is the biggest long-term threat to tape effectiveness. Birds are smart. If the tape stays in exactly the same position for weeks and nothing bad ever happens to them, they stop reacting to it. The fix is to rotate tape positions regularly. Move strips to different anchor points every two to three weeks. In agricultural applications, the standard advice is to install tape just before crops ripen and remove it immediately after harvest. That seasonal on/off approach prevents birds from getting comfortable with the tape being a permanent fixture.
Check the tape every one to two weeks. UV exposure degrades mylar faster than you would expect, and a faded or cloudy tape loses most of its reflective power. If the tape looks dull or has lost its metallic sheen, replace it. For most outdoor installations, plan on replacing tape every two to three months in summer and as needed through the rest of the year.
Also check tension and twist after any significant windstorm. Strong wind can unravel spirals or snap loose tie-offs, leaving the tape slack and flat. A quick visual walk-around takes about five minutes and can save you from a week of ineffective deterrence. For a full walkthrough of the installation process from a maintenance perspective, how to install bird scare tape covers the setup and upkeep steps together.
When birds ignore the tape: troubleshooting common problems
If birds are landing in a taped area and acting like the tape is not there, run through this checklist before assuming the product does not work.
- The tape is hanging flat or twisted so the reflective side faces the ground or a wall. Re-hang with fresh spirals and check from multiple angles to confirm the silver or holographic surface is visible from bird approach directions.
- The tape is too low. Birds are flying above it. Raise anchor points to bring tape up to or above bird perch height.
- The area is too sheltered from wind. The tape is barely moving. Extend runs to a less sheltered spot, or add more strips and a maypole arrangement to create movement from any wind direction.
- The tape has been up for more than three to four weeks without moving. Birds have habituated. Relocate all strips immediately and consider combining with a second deterrent type.
- The tape is faded or dirty. Replace it. Dirty or UV-degraded tape loses its flash effect almost entirely.
- Spacing is too wide. Add more strips or reduce the distance between runs to close gaps birds are flying through.
One specific failure mode worth knowing: Transport Canada's research found that tape became ineffective when it got so twisted over time that the reflective side was no longer visible from any angle. That is different from the intentional installation twist. Check that your installed spirals are loose enough that the tape rotates and catches light from multiple directions rather than locking into a fixed position.
If you have already tried repositioning and replacing the tape and birds are still ignoring it, the issue is almost certainly habituation combined with a strong site attachment, which means it is time to bring in a second deterrent layer. How to use holographic bird scare tape goes into more depth on maximizing the visual impact of the tape itself, which can help push habituation resistance a bit further before you need to add other methods.
Combining tape with other deterrents, and when to call a professional
Tape works well as part of a layered deterrent strategy. For moderate to severe bird problems, combining a visual scare like tape with a sonic or ultrasonic device is one of the most effective non-lethal approaches available. Bird-X specifically recommends pairing visual scares like Irri-Tape with sonic deterrents for harder cases, and the logic is straightforward: you are attacking the bird's senses from two angles at once, which makes the environment feel genuinely threatening rather than just visually odd.
Physical exclusion methods are the most reliable long-term solution for roosts and nesting sites. If birds are roosting on a ledge or roof edge, tape can help discourage landing, but bird spikes or netting will physically prevent it. Use tape as a perimeter deterrent to push birds away while spikes or netting handle the actual landing surfaces. How to use bird blinder tape covers one specific product line that is often used in exactly this kind of combined setup alongside physical barriers.
For aviation contexts, bird scare tape has a very limited role. Transport Canada's evaluation specifically concludes that reflecting tape is suitable only for limited use on airfields, and the FAA's wildlife hazard management guidance makes clear that no single deterrent is an adequate long-term solution for airport bird management. If you are dealing with a bird problem anywhere near an airfield or aviation facility, contact a licensed wildlife management professional rather than relying on DIY tape installation.
For residential and commercial properties, the point at which you should call a professional is when birds are nesting (active nests may be legally protected depending on species and location), when the infestation involves a large colony, or when you have tried a layered approach including tape, sonic deterrents, and physical barriers for several weeks without meaningful improvement. A professional wildlife control operator can assess the site, identify the species, and deploy more targeted tools than consumer products allow.
Your next steps today
If birds showed up this morning and you want them gone this week, here is what to do right now.
- Identify the exact spots birds are landing, roosting, or feeding. Note how exposed those spots are to sun and wind.
- Buy holographic bird scare tape in a width of at least 1/2 inch. Pick up enough to cover your perimeter measurement plus 25% overage, and grab some garden stakes or screw hooks if you do not already have anchor points.
- Install tape at six to seven feet above the problem area, with three to four spiral twists between anchor points and a slight natural sag on longer runs. Do not staple it flat.
- Space runs about 10 feet apart for garden protection, or place strips every 20 to 25 feet around a larger perimeter.
- Set a reminder to check tension, twist, and tape condition every two weeks, and to reposition strips to new anchor points every two to three weeks.
- If birds are still present after seven days of correct installation, add a sonic deterrent alongside the tape and close any obvious spacing gaps.
- If you have an active nest, stop and check local wildlife regulations before disturbing anything.
That is really the whole system. Tape is cheap, fast to install, and genuinely effective when used correctly. The two things that kill its effectiveness are bad placement and leaving it in the same spot too long. Nail those two variables, and you will see results quickly. If you want more detail on any specific part of the installation process, how to use bird blinder tape and the other guides in this series cover specific product types and scenarios in much more depth.
FAQ
Can I use bird scare tape indoors (near windows or in a garage)?
Usually no. The tape is designed to move with wind outdoors, if it hangs still indoors it can become ineffective quickly and birds may habituate. If you must use it near an indoor window, secure it so it can flutter freely in the presence of natural airflow, and treat it as a short-term measure while you address the window strike cause (for example, reflective surfaces or nearby food sources).
What should I do if the tape keeps tangling or knotting as it twists?
Common cause is over-twisting before tying off or uneven anchor heights. Create the spiral twist once, then avoid adding extra twists at the ends. Use evenly spaced anchor points, keep the tape runs mostly straight between anchors, and after strong wind check that the tape can rotate instead of being trapped against ties or railings.
How can I tell whether my tape is too low or too high before I adjust everything?
Do a quick behavior check at peak bird activity. If birds are landing just above it, raise the runs, and if birds are ignoring it from the start, verify it is reaching direct sun and fluttering in typical breezes. Adjust gradually, moving the tape up or down by about a foot at a time, then watch for a change in approach and landing behavior over 2 to 3 days.
Does bird scare tape work for all birds, like smaller songbirds?
It can work, but results vary by species and habituation level. Tape generally performs best for birds that react to sudden visual and noise cues. If the birds are already nesting, feeding repeatedly, or have plenty of nearby alternatives, tape may only reduce activity temporarily, so plan for a layered approach or physical exclusion.
How long should I leave the tape up before rotating or removing it?
For many residential situations, you should see reduced visits in 2 to 3 days. To limit habituation, rotate tape positions every 2 to 3 weeks, and consider seasonally removing it after the highest-risk period (for example, right after harvest in crop areas). If birds still avoid the area, you can keep rotating, but don’t let the tape stay in the exact same spots for weeks.
What’s the safest way to attach tape to railings, walls, or fences without flattening it?
Avoid stapling or pinning it flat, because that stops the motion needed for reflective flashing. Use clips designed for flexible tape, wrap around posts with ties, or use temporary lashing points that allow the tape to hang with a natural sag. Also confirm surfaces are dry before using adhesive-based clips so they don’t release in rain and wind.
Will wind direction changes make the tape stop working?
It can if the tape runs end up sheltered from flutter or aligned so the tape mostly moves edge-on. For best coverage, orient runs so wind hits broadside, and don’t place long continuous lines in areas with minimal airflow. If your yard wind varies by time of day, multiple shorter runs with cross coverage usually perform better than one long parallel run.
How do I prevent tape from rubbing through on sharp edges or rough surfaces?
Use smooth anchor points where possible, and add a protective sleeve or edge guard at any contact spot that could saw through the mylar. Check after storms, because abrasion can create tears or dull sections that reduce reflectivity and mobility.
Is ultrasonic or sonic pairing always necessary if tape isn’t working after a week?
Not always. First re-check placement variables that most often cause failure: height, sun exposure, wind access, and whether the tape is still rotating rather than locking into one angle. If birds continue landing after you correct these, adding a sonic deterrent is a strong next step because it attacks a second sense. If nests are active, also consider professional guidance before escalating deterrents.
What should I do if the tape gets dull, cloudy, or loses sheen early?
Replace it. Mylar can degrade faster in intense UV conditions, and dull tape produces less unpredictable flashing. Also inspect for over-twisting or flattening, which can hide the reflective surface from enough angles even if the tape still looks reflective.
Can I use tape to stop birds from roosting or nesting on a ledge or roof edge?
Tape is a perimeter deterrent, it can discourage landing, but it does not physically prevent roosting or nesting on its own. If birds are already on a ledge, pair tape with physical exclusion on the landing surface, like spikes or netting. If you suspect active nests, check local rules and consider contacting a wildlife professional because some species are protected.
What if birds ignore the tape even though it is installed correctly?
That pattern usually means habituation plus strong site attachment (the birds have adapted to the cues or the location still offers food and shelter). The quickest fix is to change the layout, move runs to new anchor points, and rotate locations. If you’ve already rotated and replaced and there is still no improvement, add a second deterrent layer, such as sonic devices, and remove attractants (standing water, exposed food, accessible shelter).
Is it ever appropriate to remove the tape right after installing it if birds leave?
Yes, if you used it as a short-term scare during a specific risk window. If the birds stop visiting immediately, you can keep it up long enough to prevent quick return, then rotate out or remove. However, avoid removing too soon if the birds had active feeding patterns, because they can return once the deterrent is gone.
Next Article
What Is Already Being Done to Prevent Bird Collisions
Learn what’s already used to prevent bird collisions, from airport safeguards to building glass and humane deterrents, p