Hang bird repellent tape by anchoring it at two fixed points with enough slack to let it move freely in the breeze, spacing strips no more than 2 inches apart so birds can't find a gap to fly through, and mounting it at eye level for the bird species you're targeting. Clean the surface first, choose a dry day above 50°F, and use UV-resistant tape rated for outdoor exposure. That's the core of it. The rest is getting the details right for your specific spot.
How to Hang Bird Repellent Tape: Step-by-Step Guide

Marcus Weatherby
16 Jun 2026
What bird repellent tape is and where it works best
Bird repellent tape is a visual deterrent, usually made from iridescent, holographic, or reflective Mylar film, or from translucent vinyl, that distracts and startles birds by flickering light and producing a faint hum or rattle in the wind. It doesn't harm birds. It just makes an area feel unpredictable and uncomfortable to them.
It works best in open or semi-open spaces where air movement keeps the tape active. Good candidates include patios, balconies, garden rows, fences, eaves, window exteriors, and railings. It's less effective in completely still, enclosed spaces where the tape just hangs limp and birds quickly learn to ignore it.
Window collisions are a specific use case where a different tape format, adhesive vinyl applied directly to the glass in a tight pattern, does the job. The American Bird Conservancy's ABC BirdTape is designed exactly for this: white or light-blue translucent vinyl strips or squares applied to the outside of the glass so birds perceive the window as a solid surface rather than open airspace.
Choosing the right tape for the job
Not all bird tape is the same product. Pick the wrong format and you'll waste time and money. Here's how the main types break down:
| Type | Best For | How It's Mounted | Key Limitation |
|---|---|---|---|
| Holographic/Iridescent Mylar ribbon | Patios, gardens, fences, eaves, railings | Tied or stapled between anchor points with slack | Needs wind to work; loses effectiveness indoors or in still air |
| Reflective Mylar tape (double-sided) | Fruit trees, vegetable rows, boat docks, open decks | Wrapped around posts or strung on wire/twine | UV degradation; replace seasonally in harsh sun |
| Adhesive vinyl strips (e.g., ABC BirdTape) | Window exteriors to prevent bird-window strikes | Applied directly to glass surface | Adhesion-dependent; surface must be spotless and dry |
| Holographic bird scare tape with foil backing | Broad-area deterrence, larger commercial spaces | Stapled, nailed, or zip-tied to structures | Heavier; needs stronger anchor points in high wind |
For most residential use on patios, balconies, and fences, standard iridescent Mylar ribbon is the go-to. For windows, use adhesive vinyl tape in a pattern. For gardens or boat docks, double-sided reflective tape strung on posts covers the most area efficiently.
Surface compatibility
Adhesive tapes stick to glass, smooth metal, and sealed wood. They won't bond reliably to rough brick, painted surfaces with chalky or peeling paint, or treated lumber. For non-adhesive ribbon tape, the anchor material matters more than the surface itself: nails, staples, hooks, or zip ties all work depending on the structure.
Tools and prep before you hang anything
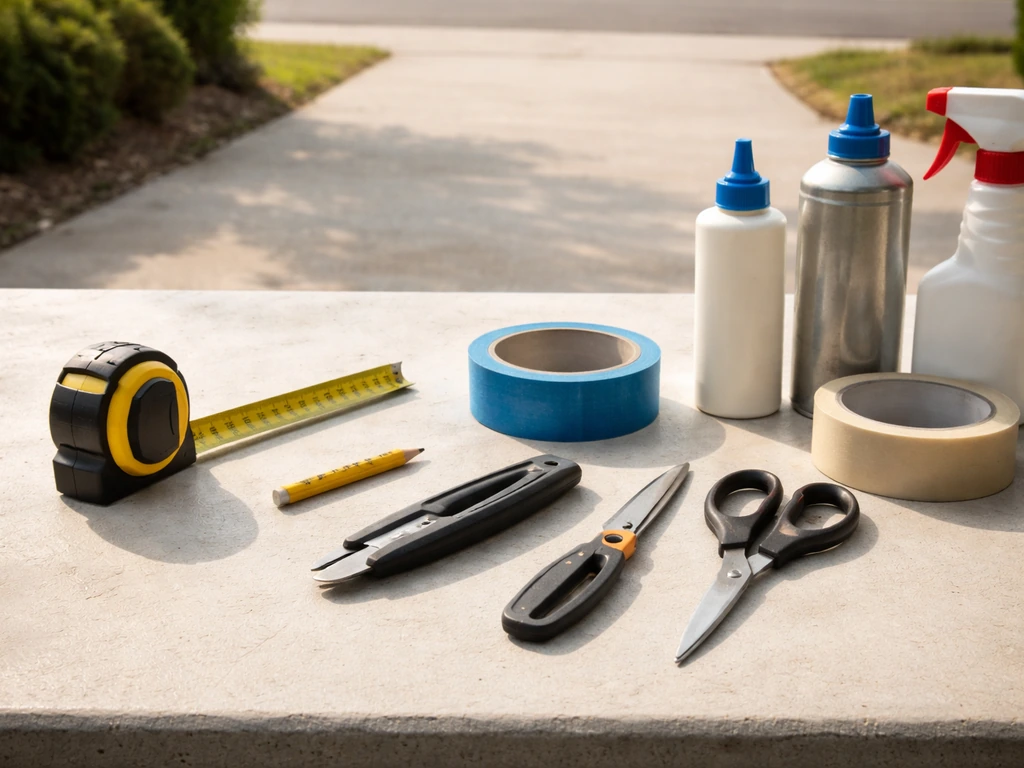
Taking ten minutes to prep properly will save you from re-doing the job in a week. Here's what you need on hand:
- Measuring tape (to calculate spacing and strip length)
- Scissors or a utility knife
- Pencil or painter's tape for marking anchor points
- Cleaning supplies: water and a lint-free cloth for adhesive tape; skip Windex or spray cleaners that leave residue
- Anchoring hardware: cup hooks, finishing nails, staple gun, zip ties, or outdoor adhesive strips depending on the surface
- Monofilament fishing line or twine for spanning longer distances
- Ladder or step stool rated for your weight if working above shoulder height
Weather and timing
Install on a dry day with temperatures above 50°F (10°C). Below that threshold, adhesive backings don't bond properly and even ribbon tape becomes brittle and harder to handle. Avoid installing before rain or high winds. A calm, clear morning gives you the best working conditions and lets adhesive tape cure before it gets wet.
Ladder and safety basics
If you're working on eaves, soffits, or upper-floor windows, use a ladder rated for your weight plus tools, set on level ground, and have someone spot you. Don't overreach to the side. Move the ladder rather than stretching. For rooflines or gutters, wear non-slip shoes and consider a safety harness if you're going onto the roof itself. Tape installation rarely requires that kind of height, but eave work sometimes puts you close to roof edges.
How to hang bird repellent tape: step by step
These steps apply to ribbon-style tape on structures like fences, railings, eaves, and garden posts. If you're installing on windows, the steps and spacing are different from ribbon tape on fences and eaves adhesive window tape. If you want the quick answer on bird scare tape: how to use it step by step, follow the process below for the right type and placement. For adhesive window tape, see the window-specific section below. If you are specifically using holographic bird scare tape, the key is to mount it so it catches light and flutters in airflow, not so it stays flat.
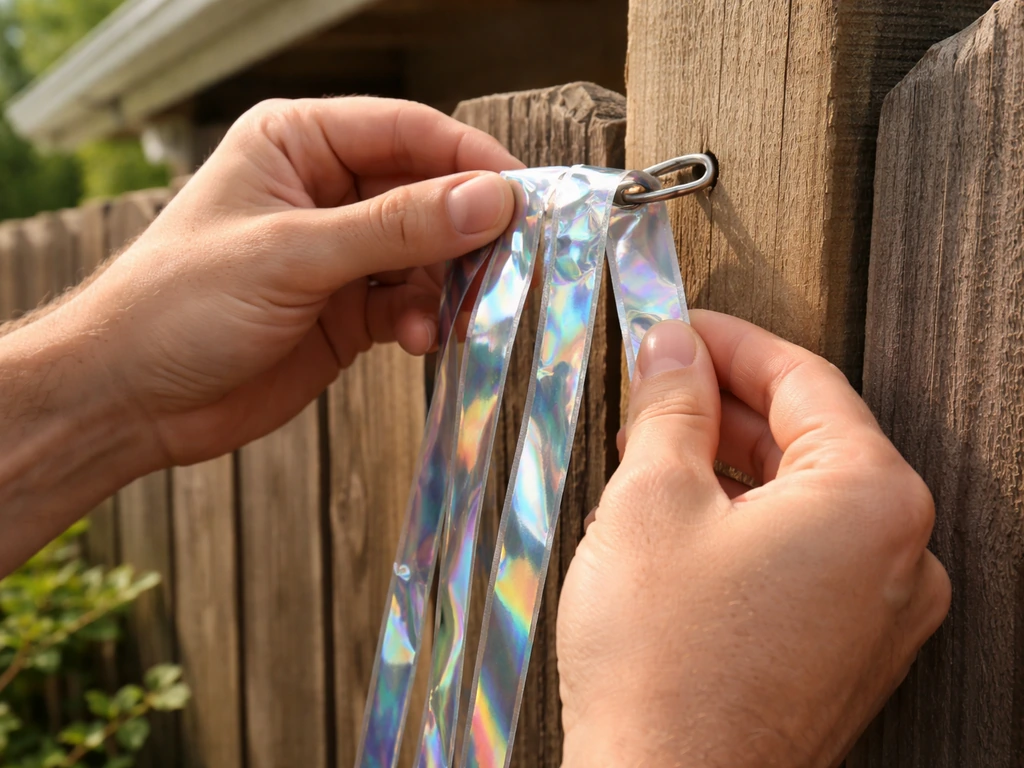
- Identify your anchor points. Look for existing hooks, nails, posts, or railings you can tie to. If you need new anchors, mark placement with a pencil before drilling or nailing.
- Measure the span between anchors. Cut your tape strips about 4 to 6 inches longer than the span so you have enough to tie or staple at both ends without pulling the tape taut.
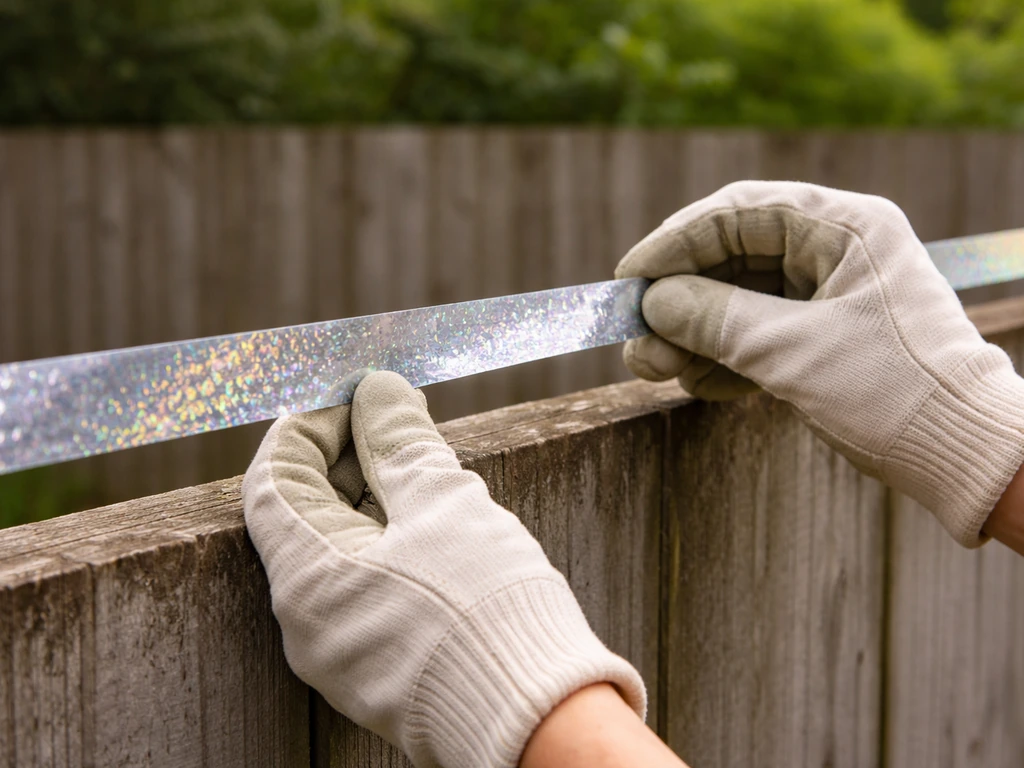
- Attach one end first. Tie, staple, or hook the tape securely to the first anchor. Make sure it can't slip or pull free.
- Run the tape across with gentle slack. Don't pull it tight like a wire. You want it loose enough to flutter in a light breeze but not so loose it drags or tangles.
- Secure the second end at the same height as the first to keep the strip level and maximally visible.
- Add parallel strips at 2-inch intervals if covering a window or enclosed opening. For open areas like gardens, 2 to 3 feet between strips is workable, but tighter spacing is more effective.
- Step back and observe movement. Even a gentle breeze should make the tape shimmer. If it's completely still, check that it's not snagged or pinned against a surface.
- Check anchor points after the first windy day. Tighten or re-tie anything that has shifted.
Getting the tension right
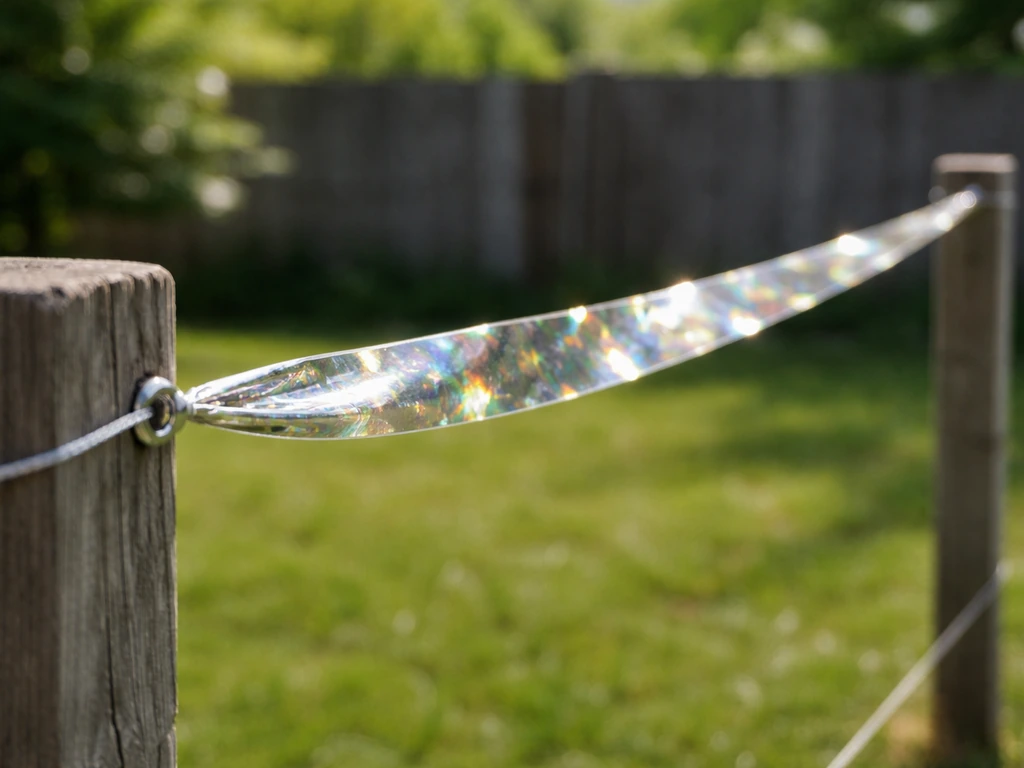
Tension is one of the most common mistakes. If you want your reflective bird tape to work, focus on getting the tension and spacing right so it can flutter and stay visible from the birds' approach path Tension is one of the most common mistakes.. Too tight and the tape can't flutter, which kills most of its deterrent effect. Too loose and it wraps around itself or nearby branches and stops moving. A gentle S-curve hang between two points is about right. For longer spans over 6 feet, add a center anchor to prevent sagging and tangling.
Spacing rules that actually matter
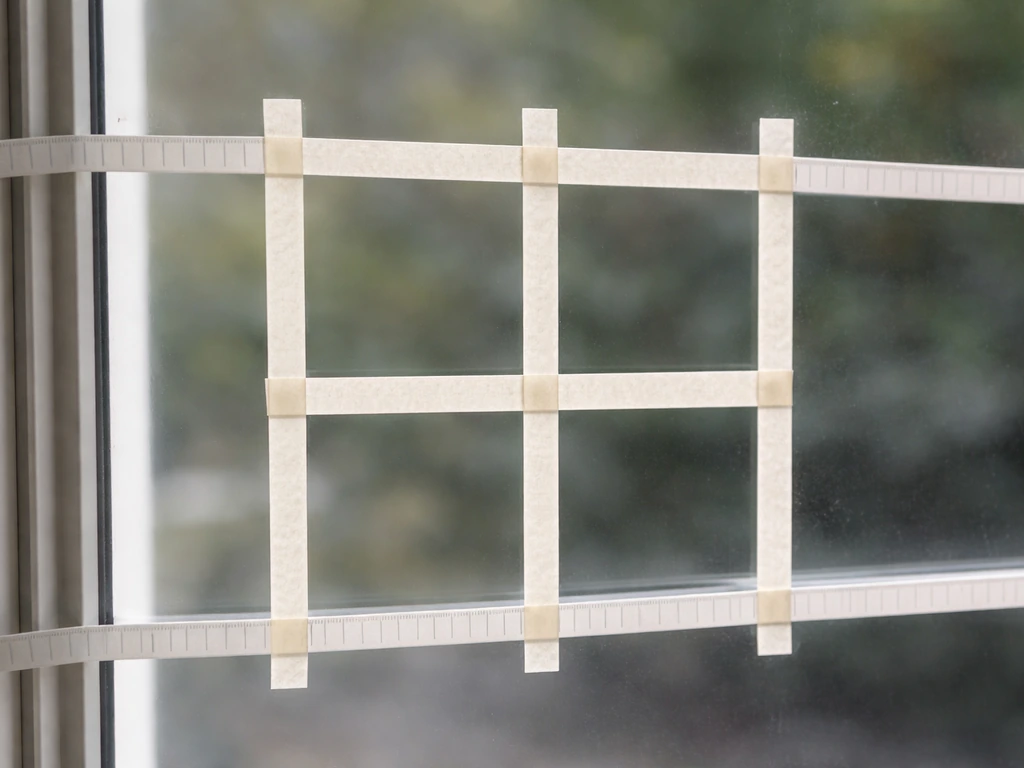
For window coverage, the 2-by-2-inch rule is the standard backed by bird safety research: no open gap in the pattern should be larger than 2 inches by 2 inches, because birds judge openings by whether they can fit through them. For open-area deterrence like gardens or patios, you're working with larger spacing, but tighter is always more effective. Think of it this way: every gap is an invitation.
Placement by area: what to do where
Windows
For windows, use adhesive vinyl tape applied to the exterior glass surface. Clean the glass with plain water and a lint-free cloth. Avoid any cleaning products that leave residue, including glass spray cleaners, because they prevent the adhesive from bonding. Apply strips vertically or in a grid pattern, keeping open spaces no larger than 2 inches by 2 inches. Smooth out air bubbles as you go. The tape goes on the outside of the glass, not the inside.
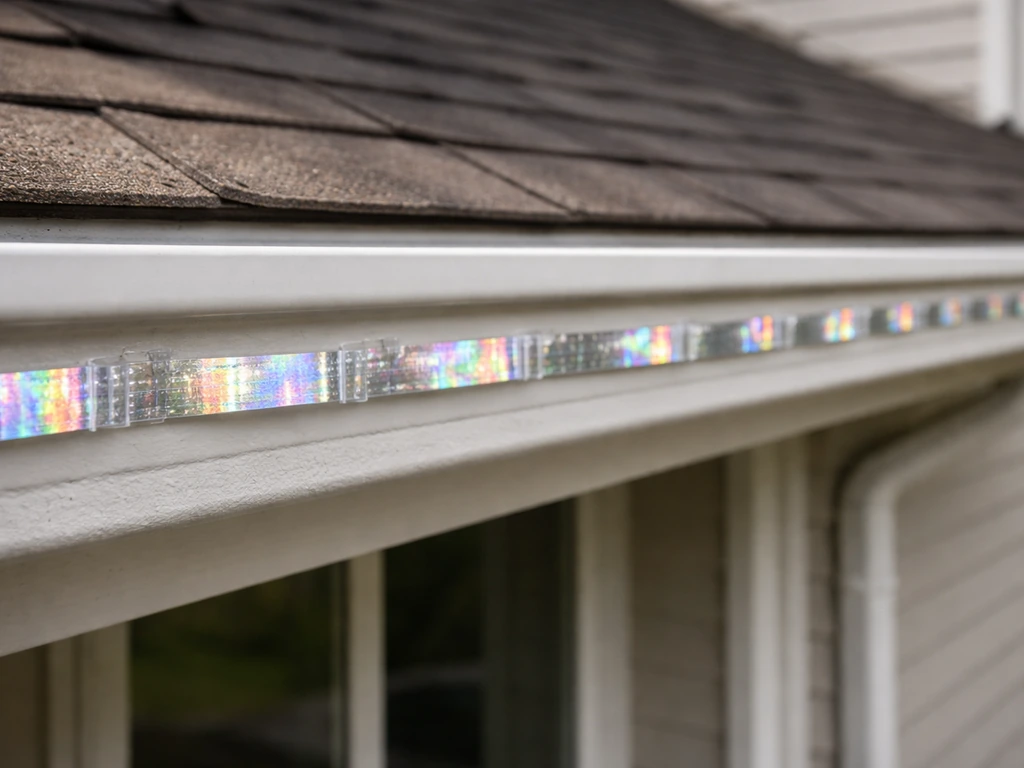
Eaves and soffits
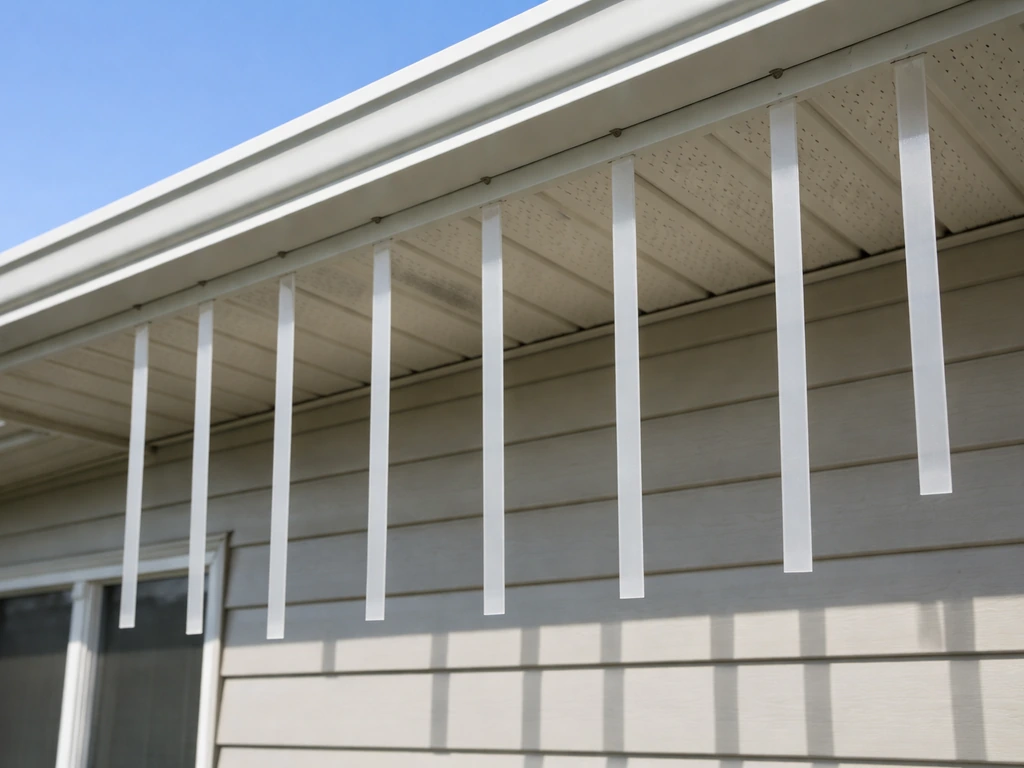
Hang strips vertically from the eave edge so they hang down in front of the soffit face. This position puts the tape in the flight path of birds approaching to roost or nest. Use cup hooks or small screw eyes spaced every 8 to 12 inches along the eave for a curtain effect. Make sure strips are long enough to hang below the soffit line where birds are landing.
Ledges and railings
Tie tape between railing posts or balusters so it runs horizontally just above the top rail. Birds looking to perch will encounter the moving tape at eye level before they land. For flat ledges like window sills or parapet walls, you can anchor tape to the wall above the ledge and let it hang down over the landing surface.
Patios and balconies
String tape horizontally across the open face of a patio or balcony at multiple heights: roughly 18 inches off the floor, 3 to 4 feet, and just below the ceiling or overhang. Multiple levels work better than a single line because birds will often fly under or over a single barrier. Attach to posts, railing tops, or overhead beams with hooks or staples.
Fences
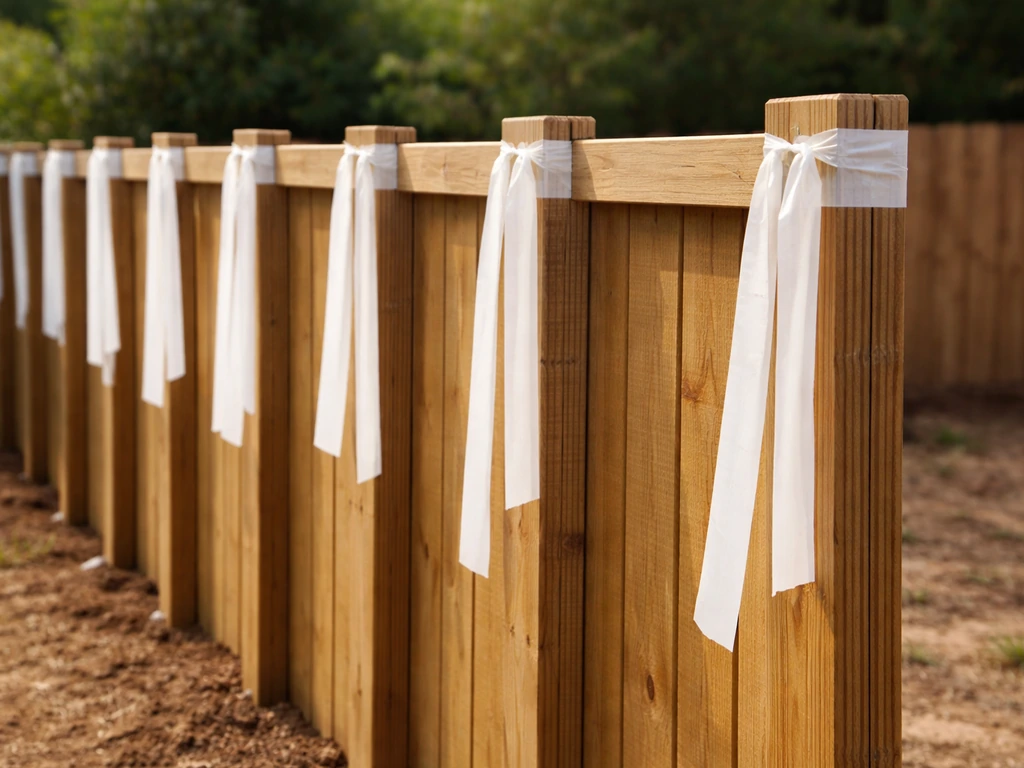
Staple or tie strips vertically to the top of fence posts every 2 to 3 feet along the fence line, letting them hang down 12 to 18 inches. Alternatively, run a horizontal line of monofilament along the fence top and hang tape strips from it at regular intervals. This works well for keeping birds off fence tops where they like to perch.
Gardens and fruit trees
Drive wooden stakes or metal posts around the garden perimeter and string tape between them at roughly plant-top height. For fruit trees, tie strips to outer branches so they drape and move freely. Don't tie them so tightly to the branch that they can't flutter. Change the positions of strips every few weeks so birds don't get used to them.
Gutters and curved surfaces
For gutters, use zip ties or gutter clips to anchor tape to the gutter lip. Hang strips vertically down the fascia board below the gutter where swallows or starlings tend to nest. Curved surfaces like arched window frames or rounded posts are trickier for adhesive tape; ribbon tape tied loosely around the curve works better than trying to press adhesive film onto a rounded surface.
Protecting your surfaces while you work
Adhesive tape can damage paint or finishes when removed, especially on older or chalky painted surfaces. Before applying any adhesive tape to painted wood, trim, or siding, test a small inconspicuous area and leave it for 48 hours. When removing, pull slowly at a low angle rather than yanking straight out. Applying heat from a hair dryer softens the adhesive and reduces the risk of pulling up paint.
For delicate finishes like powder-coated metal railings or stained wood, use mechanical anchors like hooks or zip ties instead of adhesive tape. This way you avoid any bond with the surface entirely.
Wind loading is worth thinking about on exposed corners and rooflines. Long spans of tape in high-wind areas create pull on the anchor points. Use heavier-gauge hardware in exposed locations and inspect anchors after the first storm. A stripped screw or popped staple sends the whole strip of tape flapping away and leaves the birds completely undeterred.
Also leave enough airflow clearance so the tape doesn't slap repeatedly against siding or glass in the wind. Constant contact with a surface causes wear on both the tape and the surface, and a tape pressed flat against a wall isn't moving and isn't deterring anything.
Keeping it working: maintenance and what to do when birds stop caring
How long does it last?
Outdoor Mylar tape in direct sun typically lasts one to two seasons before UV exposure dulls the reflective surface and reduces its effectiveness. Adhesive vinyl window tape can last longer, often two to three years, but check the edges for peeling, especially after temperature swings. When tape loses its sheen or starts to fray, replace it. Faded, limp tape is just decoration at that point.
When birds habituate
Birds are smart. If you hang tape in the same spots for weeks on end without changing anything, they figure out it's harmless and start ignoring it. The fix is simple: move the tape. Change the height. Add new strips in different positions. Rotate between tape and another deterrent like reflective pinwheels or a sonic device. The unpredictability is what keeps birds wary, not the tape itself.
When tape alone isn't enough
Tape works well as a first-line deterrent for casual perching and flyover deterrence. It's less reliable for birds that are highly motivated, like pigeons at a roost they've used for years, or starlings that have already nested in an area. For those situations, combine tape with physical exclusion like spikes or netting to remove landing options entirely, or add a sonic deterrent that broadcasts distress calls. The tape handles visual deterrence; the other methods handle the structural reality of the perch site.
Commercial and aviation-adjacent settings, where bird pressure is high and consistency matters more, usually need a layered approach from the start. Tape alone rarely meets the threshold in those environments, but it's a useful supplement to netting or spike installations by reinforcing the perimeter with visual deterrence.
A simple maintenance schedule
- Weekly: Check that tape is still moving freely and hasn't wrapped around itself or an anchor point.
- Monthly: Inspect anchor points for loosening; retighten or replace as needed.
- Every 4 to 6 weeks: Reposition strips to a different location or height to prevent bird habituation.
- Seasonally: Check reflective surface quality; replace any strips that have gone dull or started to fray.
- Annually: Do a full reinstall with fresh tape before peak nesting season in your region, typically early spring.
FAQ
Can I hang bird repellent tape too tight, or does it need slack?
Yes, but only if it can move. For most ribbon-style tape, aim for a gentle flutter, a slight S-curve hang, and clearance so it does not repeatedly hit siding, glass, or railings. If the tape is tight or pressed flat, it stops flickering and birds learn it is harmless.
What should I change if birds ignore the tape after installation?
If the tape is fluttering and spaced correctly but birds still linger, it is often a placement issue. Reposition so the tape sits in the birds' approach path (for example, in front of the landing area on ledges, or at eye level on railings). Also add coverage at multiple heights, since birds may fly under a single line.
How do I know when bird repellent tape is no longer working and needs replacement?
Replace it when it becomes dull, frayed, or stays limp in the wind. Typical service life is about one to two outdoor seasons for UV-exposed Mylar ribbon, and two to three years for adhesive window vinyl, but heat and sun direction can shorten that. A quick check is whether it still catches light clearly from the birds' approach angle.
Is window bird repellent tape supposed to be applied inside or outside the house?
For glass, do not install from the inside. Adhesive window tape should go on the exterior surface so it presents the window as a solid barrier from the birds' perspective. If you apply it inside, you may reduce effectiveness and increase edge peeling due to different temperature and cleaning conditions.
What surface prep steps matter most, especially for adhesive tape?
Cleanliness affects bonding and flutter. For non-adhesive ribbon on hardware and nails, you still want anchors secure and surfaces free of debris so the tape does not snag. For adhesive window tape, use plain water and a lint-free cloth, and avoid any glass cleaner that leaves residue, because residue can prevent reliable adhesion.
Can I use adhesive bird tape on brick, stucco, or old painted wood?
You can, but only when using the correct hardware for the surface. Adhesive tape can fail on rough brick, chalky or peeling paint, and some treated lumber. If your area has those conditions, switch to mechanical anchors like cup hooks, small screw eyes, staples, zip ties, or monofilament as the support line.
How often should I move or rotate the tape to keep it effective?
Staying on one spot for weeks is a common failure pattern. Birds can habituate to a fixed visual cue, even if it was initially effective. Rotate placements by changing height and adding or removing strips, then keep gaps small so birds do not find a consistent pass-through route.
Does bird tape work the same in covered or enclosed areas?
Usually no. For protected patios or balconies with decent airflow, normal tension and spacing works well. However, in enclosed, still corners where airflow is limited, the tape may not flutter enough, and birds can ignore it. In those spots, add more lines at different heights or switch to a different deterrent strategy.
Will wind damage the tape or pull it down, and how can I prevent it?
Yes, especially on long runs. High winds can increase pull at anchor points, causing staples to pop or screws to strip. Use heavier-gauge hardware on exposed corners and inspect after major storms, tightening or replacing any failed anchors before re-hanging.
How do I choose the correct tape type for fences, eaves, or windows?
The right pattern depends on the product type and location. Ribbon-style tape generally relies on fluttering movement, while adhesive window tape depends on creating small, consistent gaps that birds cannot fit through. If you are treating a fence or eave, use the ribbon approach, and if you are treating a window collision zone, use the window-specific adhesive pattern.
What is the safest way to remove bird repellent tape without damaging paint or finishes?
Use a low-angle technique to remove adhesive tape after testing first. Before full removal, test a hidden area for 48 hours, then pull slowly at a low angle. If adhesive resists, apply gentle heat with a hair dryer to soften it, which reduces the chance of lifting paint or finish.
Is it safe to install tape near gutters or upper-floor eaves, and what precautions should I take?
Yes, but anchor choice and safety matter. If you cannot safely reach rooflines or eaves, do not stretch or overreach. Use a properly rated ladder, keep it stable on level ground, and have someone spot you. Consider mechanical mounting options so you are not relying on fragile adhesive near edges.
Next Article
How to Use Bird Repellent Tape Step by Step Guide
Learn how bird repellent tape works and apply scare tape to ledges, gutters, and rails with spacing, safety, and trouble