
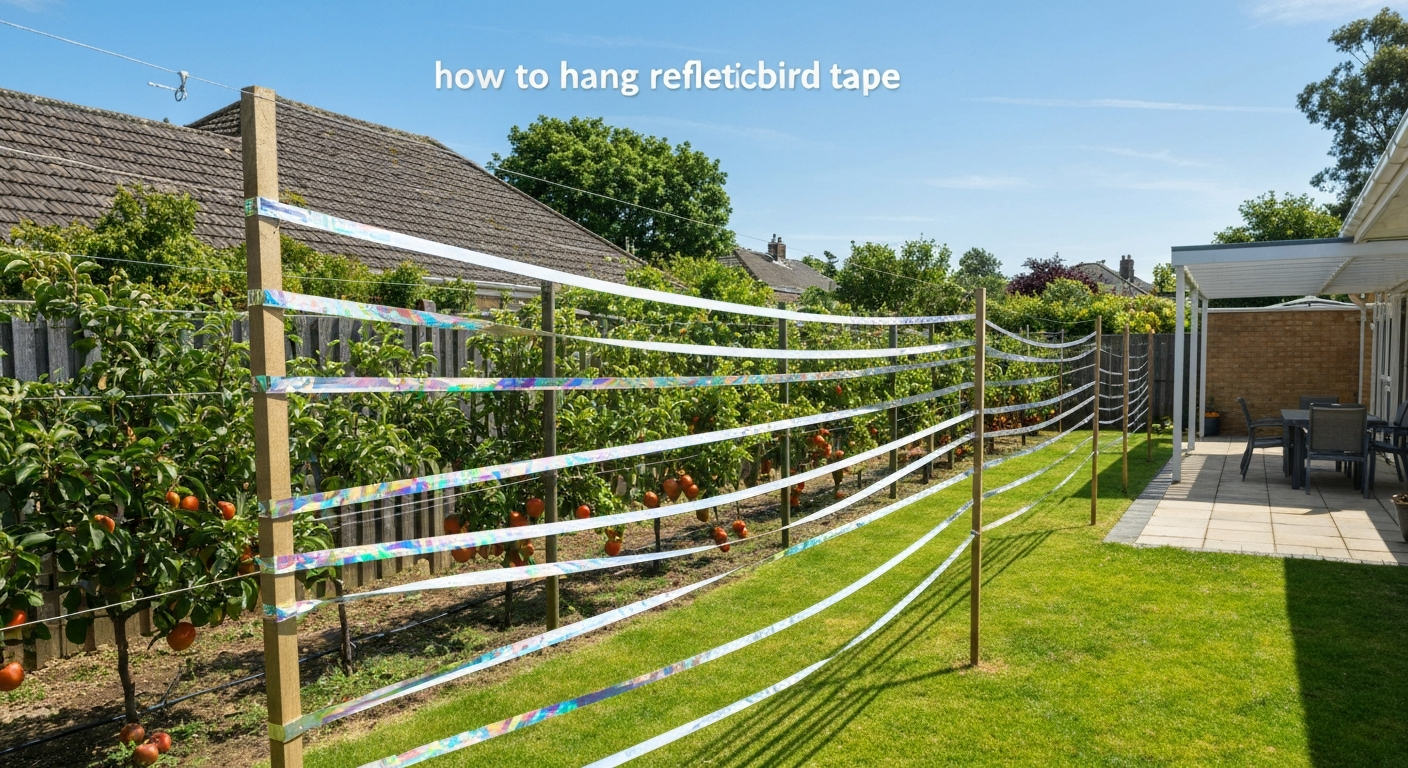
To hang reflective bird tape, cut strips to your desired length (typically 1–2 metres), secure one end to a fixed anchor point at 0.5–1 metre above the area you want to protect, stretch the tape taut enough to flutter freely in a light breeze, and fasten the other end. Space parallel runs about 1–3 metres apart so birds cannot easily fly between them without encountering a flash of reflected light. That basic setup covers most gardens, patios, balconies, and fruit rows. The rest of this guide fills in the details for specific surfaces, explains what type of tape to use where, and is honest about where tape works well and where it falls short.
How to Hang Reflective Bird Tape: Step-by-Step Guide for Gardens

Marcus Weatherby
16 Jul 2026
Who this guide is for
This is a practical DIY guide for homeowners protecting a garden bed or patio, fruit growers covering a small plot, property and facility managers dealing with birds on rooftops or docks, solar-panel owners noticing nesting under their array, and farmers or maintenance teams looking for a low-cost first line of deterrence. If you want to know what reflective tape actually is, why it sometimes works (and sometimes does not), how to install it correctly on different surfaces, and how to pair it with other methods for better results, this guide delivers all of that in one place.
What reflective bird tape actually is
Reflective bird tape is a thin, flexible film ribbon, usually made from BoPET (biaxially oriented polyethylene terephthalate, sold commercially as Mylar). It is produced in widths typically ranging from about 11 mm up to 50 mm and is wound onto rolls for retail sale. The key property is that it reflects and scatters light in multiple directions, producing rapid flashes as the tape moves in wind. Most tapes are also metallic-coloured or printed with a holographic pattern on at least one side, which amplifies the visual disturbance.
There are three common variants you will see on the market, and they are not identical in how they work or where they perform best.
Standard reflective (Mylar) tape
This is the original product tested in USDA field trials going back to the 1980s. It is a plain silver or gold metallic film that reflects sunlight strongly. It is inexpensive, widely available, and works well in direct sun. On overcast days its effect is weaker because there is less light to bounce.
Holographic tape
Holographic tape has a diffraction-grating pattern embossed or printed into the film surface. This breaks white light into its spectrum, creating rainbow flashes at low angles and in diffuse light as well as direct sun. It is generally considered more effective than plain reflective tape in partly shaded locations because it produces a visual disturbance across a wider range of lighting conditions. Products such as Bird-X Irri-Tape are examples of this category.
Blinder-style tape
Blinder tape (sometimes called bird blinder ribbon or double-sided tape) uses a combination of reflective surfaces and, in some products, printed eye-spot or predator patterns. Rather than relying purely on light reflection, it attempts to combine multiple visual cues. It is a newer category compared with plain Mylar, and while some users report good results, independent controlled research specifically on blinder tape is limited.
How and why reflective tape deters birds
Birds rely heavily on vision, and their visual system extends into the UV spectrum, which means they perceive reflected light more intensely than humans do. When a strip of metallic or holographic tape twists in the wind, it produces rapid, unpredictable flashes that birds interpret as a potential threat or novel disturbance. That sudden visual jolt triggers an avoidance response.
There is also an auditory component. When narrow tapes flutter and slap in a stiff breeze, they produce a humming or crackling noise. USDA research notes that this combined visual-plus-auditory signal may strengthen the deterrent effect compared with a silent stationary reflector. This is why keeping tape loose enough to move freely matters: a tightly stretched, motionless strip loses most of its deterrent value.
The honest caveat is that birds habituate. Extension and ornithological sources consistently report that many species, including starlings, sparrows, pigeons, and corvids, initially avoid a new tape installation but return within days to weeks once they learn the flashing is not actually dangerous. Habituation is faster when birds have a strong incentive to stay, such as a reliable food source, nesting site, or shelter. This is why rotating the position of your tape, combining it with other deterrents, and deploying it early (before birds establish a habit) all matter.
Reflective vs holographic vs blinder: which type for which job
| Tape type | How it works | Best conditions | Typical use cases | Limitations |
|---|---|---|---|---|
| Standard reflective (Mylar) | Mirrors sunlight as metallic flash | Bright, direct sunlight | Open gardens, crop rows, fences, docks in sunny climates | Weak in shade or overcast; habituates quickly |
| Holographic | Diffracts light into spectrum flashes | Both direct and diffuse light | Patios, balconies, eaves, under-roof areas, partly shaded sites | Higher cost; still subject to habituation |
| Blinder-style | Combines reflective surfaces with printed visual patterns | Open areas where birds approach from multiple directions | Windows, perimeter fencing, garden beds | Limited independent trial data; heavier weight can reduce flutter in light wind |
For most homeowners in a sunny location, standard reflective Mylar tape is the most cost-effective starting point. If your site is shaded for more than half the day, step up to holographic tape. Blinder tape is worth trying at windows or perimeters where you want visual coverage in multiple directions, but keep expectations realistic until you see how your local bird population responds.
Choosing the right tape and attachment hardware
Before you buy anything, think through three criteria: visibility, durability, and surface compatibility.
Visibility
The tape needs to be placed where birds approach your site, not just where it is convenient to hang. Aim for the flight path into a garden, the edge of a rooftop, or the perimeter of a fruit row. Tape hidden behind foliage or under an opaque overhang does very little. Wider tape (25–50 mm) produces more visible flash per strip than narrow tape, so you can use fewer parallel runs. Narrow tape (11 mm) is lighter and flutters more easily, which makes it useful in locations where wind is light.
Durability
BoPET film degrades under UV exposure, and the holographic embossing on premium tapes can fade faster than the underlying film. Retail product listings (for example Dalen holographic tape) commonly cite an outdoor lifespan of roughly two years under typical conditions, but in high-UV climates or coastal environments with saltwater spray, you should expect to replace tape sooner. Buy UV-stabilised tape if it is available, check for salt-resistance claims if you are near the coast, and plan a visual inspection every three to four months.
Surface compatibility and hardware
How you anchor the tape depends entirely on the surface you are working with. The table below covers the most common situations.
| Surface | Recommended anchor method | Hardware needed | Notes |
|---|---|---|---|
| Garden stakes / fence posts | Tie or staple tape to stakes driven into soil | Wooden or metal garden stakes, garden twine or zip ties | Drive stakes 0.5–1 m above ground level; space 1–3 m apart |
| Timber fence or trellis | Staple gun or screw-in cup hooks | Staple gun or cup hooks, UV-resistant twine | Pre-drill for hooks to avoid splitting; use stainless fixings outdoors |
| Masonry or brick wall | Adhesive hook or masonry screw with cup hook | Masonry drill bit, wall plugs, stainless cup hooks | Avoid drilling into historic or listed masonry without permission |
| Metal balcony railing | Zip tie or clip-on cable tie through drilled hole in tape end | Stainless steel zip ties or railing clips | Avoid overtightening to keep tape free to move |
| Eaves or fascia board | Screw-in hook or adhesive outdoor hook | Exterior-rated adhesive hooks or stainless cup hooks | Test adhesive hook load capacity before relying on it in wind |
| Tree branch | Tie with UV-resistant garden twine looped over branch | Garden twine, scissors | Check regularly; growth can tighten the tie and damage the branch |
| Vinyl or composite decking post | Zip tie or hook screwed into post end-grain | Short stainless screws, cup hooks, zip ties | Avoid adhesives on vinyl as they can stain or delaminate the surface |
Tools and materials checklist
Gather everything below before you start. A mid-installation trip to the hardware store usually means the tape sits uninstalled for another day.
- Reflective, holographic, or blinder-style bird tape on roll (width and length to suit your site)
- Measuring tape or ruler
- Scissors or utility knife with fresh blade
- Garden stakes, fence posts, or other vertical anchors as needed
- Stainless steel cup hooks or screw-in hooks (rust-free is important outdoors)
- UV-resistant garden twine or paracord (if running a cord line between anchors first)
- Stainless steel zip ties for metal or railing surfaces
- Staple gun with stainless or galvanised staples (for timber surfaces)
- Masonry drill bit, wall plugs, and a cordless drill (for masonry surfaces)
- Step ladder rated for your working height
- Work gloves (BoPET film edges can be sharp; also required if using a drill overhead)
- Safety glasses (when drilling overhead or into masonry)
- Permanent marker for marking cut lengths on the roll
Step-by-step installation
These steps work for the most common installations: a garden bed, patio perimeter, balcony railing, or fruit-tree row. For a quick practical walkthrough on how to use bird repellent tape, see the linked guide on how to use bird repellent tape. For step-by-step photos and a compact checklist on how to install bird scare tape, see our how to install bird scare tape guide. See the step-by-step guide on how to hang bird repellent tape for detailed measurements, hardware choices, and safety tips. For a concise, practical walkthrough with photos and quick tips, see bird scare tape: how to use. Surface-specific notes follow underneath.
Installation steps
- Plan your layout first. Walk the area and identify where birds typically enter or land. Mark anchor points with chalk or a stick. Aim for parallel runs spaced 1–3 metres apart, running perpendicular to the birds' main approach direction.
- Install anchor points. Drive garden stakes, fix cup hooks, or attach railing clips at your marked positions. Place anchors at a height of 0.5–1 metre above the surface you want to protect (above crop height for gardens; at railing-top height for balconies).
- Run a support cord if needed. On longer spans (over 3 metres between fixed structures), run a UV-resistant twine or paracord between your anchor points first. This gives you a stable line to attach tape at any interval without needing a fixed anchor every metre.
- Cut tape to length. Unroll the tape on a flat surface and cut strips to your planned run length plus 15–20 cm extra at each end for tying or stapling. Mark the cut line first with a permanent marker to keep cuts straight.
- Attach the first end. Tie, staple, or clip the tape end securely to the first anchor or support cord. The attachment should hold the tape firmly but allow the body of the strip to hang and twist freely.
- Tension the tape. Stretch the tape until it is taut but not rigid. You want it to flutter and spin in a light breeze. If the tape is over-tightened it will not move; if it is too loose it will tangle around itself or the support.
- Attach the second end. Secure the far end to the opposite anchor. Do a final tension check: hold the midpoint of the strip and let go; it should bounce and twist easily.
- Repeat for additional runs. Work across the site row by row, maintaining your planned spacing. For perimeter protection on a patio or garden bed, run strips along all open sides.
- Check for gaps. Walk the perimeter and look for entry gaps wider than 1–2 metres where a bird could fly in without encountering tape. Add extra strips or tighten spacing at those points.
- Record the installation date. Write it on a label attached to one anchor, or photograph the setup with your phone so you have a dated reference for maintenance scheduling.
Printable installation checklist
- Anchor points marked and installed at correct height (0.5–1 m above protected surface)
- Support cord run between anchors on spans longer than 3 m
- Tape cut to length with 15–20 cm surplus at each end
- First end of each strip secured firmly
- Tape tensioned: taut but free to flutter
- Second end secured
- All runs spaced 1–3 m apart
- Perimeter gaps checked and filled
- Installation date recorded
Surface-specific installation notes
Patios and balconies
On a patio, run strips vertically from an overhead structure down to the railing or from railing post to railing post. Holographic tape is the better choice here because patios are often partially shaded by an awning or wall. Space strips every 1–1.5 metres along the open edge. For a balcony with solid railings and no overhead beam, screw-in cup hooks at the top of the railing and attach strips so they hang down at least 60 cm into the open space.
Windows
Window collisions are a separate problem from deterring perching birds, but some of the same tape can help with both. Hang vertical strips of holographic tape on the outside of the window, spaced no more than 10 cm apart if the goal is to prevent collisions, or 30–50 cm apart if the goal is to discourage perching on the sill. Use adhesive outdoor hooks on the frame above the window, or a tension rod across the top of the window exterior to hang strips from.
Gardens and fruit rows
This is where the most field-trial evidence exists. Washington State University extension guidance recommends driving stakes at row ends and midpoints, running twine at 0. Extension guidance (Protecting Strawberries from Birds with Netting and Mylar Tape (WSU Extension) / Bruggers field methods summarized in extension literature) recommends stakes at row ends and midpoints with tape suspended about 0.5–1 m above the canopy in parallel rows spaced from roughly 1–5 m depending on plot size. 5–1 metre above crop canopy level, and attaching tape at 1–2 metre intervals along the twine. Protect all sides of the plot, including entry gaps between rows. For small plots (under 20 square metres), dense spacing of strips every 1 metre gives better results. Extension sources are consistent that netting is more reliable for high-value crops, and tape works best as a short-term or supplementary measure.
Rooftops and eaves
Attach cup hooks to fascia boards or rafter tails and hang strips down from the eave line. For flat rooftops, anchor stakes or weighted bases along the roof edge and run horizontal tape rows above the parapet. Make sure any fixings into roofing materials are sealed with a weatherproof compound to prevent water ingress. Check with your building manager or lease agreement before drilling into commercial roofing membranes.
Fences and docks
Fences are natural attachment points. Run horizontal tape lines between fence posts at 20–30 cm intervals above the top rail to discourage perching. On docks and piers, use stainless steel hardware only because standard zinc-coated fixings corrode quickly in marine environments. Bird-X product literature specifically flags saltwater exposure as a factor in tape degradation, so expect more frequent replacement in coastal installations.
Pools
Pool areas attract gulls, herons, and waterfowl. Run tape lines from pool-fence posts across the open water surface at 1–2 metre height and 1–2 metre spacing. For a pool with no fence, temporary stakes in planters or weighted ground anchors around the perimeter can hold anchor lines. Tape near pools degrades faster from UV reflection off the water surface and from chlorine vapour, so inspect monthly.
Solar panels
This is the surface where I would be most cautious about relying on tape. Industry guidance and independent solar reviews are clear: reflective tape and other visual deterrents are a short-term measure for rooftop PV arrays, not a durable solution. Pigeons in particular will habituate and resume nesting under panels quickly. The solar industry and independent installers consistently recommend physical exclusion, specifically critter-guard mesh or perimeter screening clipped to the panel frame, as the only reliably effective approach for solar installations. If you want to try tape as a temporary measure while arranging a mesh installation, hang strips from the roof ridge above the array and along the guttering edge, keeping them well clear of the panel surface. Critically, check with your panel manufacturer and installer before attaching anything to the panel frame or roof, as many equipment warranties explicitly exclude damage caused by modifications. Bird damage from nesting and droppings is also commonly excluded from equipment warranties.
Spacing, height, and timing: the numbers that matter
USDA field trials used tape suspended in parallel rows with strip spacings ranging from approximately 5 metres in large crop fields down to 1–2 metres in small plots, with tape height set at 0.5–1 metre above the crop surface. For non-crop residential sites, the same principles apply: the tighter the spacing and the closer the tape is to the level where birds are landing or feeding, the harder it is for them to ignore it.
Timing matters too. Deploy tape before birds establish a feeding or nesting routine at a site. Once pigeons or starlings have decided a spot is safe, they are much harder to displace. Early-season deployment on fruit gardens, for example before fruit ripens and becomes attractive, gives the tape a better chance of working. Moving strips to a new position every 7–10 days delays habituation.
Weatherproofing and maintenance
Reflective tape is low-maintenance but not zero-maintenance. Schedule a visual check every 4–6 weeks. Look for strips that have become tangled, torn, or so faded that the reflective coating is no longer visible. Replace damaged strips immediately: a limp, non-reflective length of film does nothing and makes the whole installation look less credible to any pest-bird management inspector.
In autumn, check that fallen leaves have not tangled around the tape lines and weighed them down. In winter, ice can cause tape to crack or the adhesive on holographic coatings to delaminate. After any storm, do a full walk-around and re-tension any slack sections. The roughly two-year lifespan cited by manufacturers like Dalen is a fair estimate for moderate climates; plan to replace the entire installation every 18–24 months as a routine, even if strips look intact, because UV degradation reduces reflectivity before visible fading occurs.
How well does it actually work, and for which birds
Honest answer: tape works best as a short-term deterrent for small sites, and its effectiveness varies considerably by species. Here is what the evidence shows.
| Bird species / group | Initial response to tape | Habituation rate | Notes |
|---|---|---|---|
| Starlings | Often strong initial aversion | Fast (days to 1–2 weeks) | Return quickly when food source remains; rotate tape frequently |
| House sparrows | Moderate initial aversion | Fast | Dense spacing needed to reduce access to small garden beds |
| Pigeons / doves | Variable; often weak initial response | Fast to moderate | Highly motivated by shelter and food; tape alone rarely sufficient for established colonies |
| Gulls (loafing areas) | Moderate; tape can reduce use of loafing sites | Moderate | Belant & Ickes (1997) found flags effective at some loafing sites but not at nesting colonies |
| Gulls (nesting colonies) | Generally resistant | Not applicable; tape is largely ineffective at colonies | Physical exclusion or professional integrated programs required |
| Corvids (crows, ravens) | Initial aversion, especially to novel installations | Moderate to fast | Corvids are highly intelligent; vary placement regularly |
| Herons and wading birds | Moderate initial aversion at water margins | Moderate | Combine with physical barriers at pond edges for better results |
Field research (Bruggers et al., 1986) showed statistically variable results across crop types and species, with the clearest benefits when tape was combined with protected entry points and other deterrents. Bruggers et al. (USDA/Denver Wildlife Research Center) field trials (1986) reported that thin Mylar reflecting tape (≈0.025 mm × 11 mm) suspended in parallel rows above ripening crops reduced bird activity and damage in some crops when entry points were also protected, with effectiveness varying by site and species (NWRC content) Bruggers et al. (1986) field trials. The overall scientific consensus, confirmed by a 2022 MDPI review of bird deterrent solutions, is that visual devices including reflective tape can reduce damage in small, well-installed deployments but that habituation is common and multimodal programs produce more durable results.
Troubleshooting common problems
- Birds are ignoring the tape: Move strips to a new position, change the tape type (try holographic if you were using plain Mylar), and add a complementary deterrent such as a predator call device or physical spike on the landing surface.
- Tape is tangling constantly: It is either too close to adjacent strips or in a turbulent airflow zone. Increase spacing between strips by 30–50 cm or move the installation to a less turbulent location.
- Tape keeps tearing at the attachment points: Reinforce the attachment with a small loop of garden twine around the tape end, or use a purpose-made tape clip. Tape should not be stapled through its centre because that creates a tear line.
- The tape is not moving even in a breeze: It is over-tensioned. Loosen each end by 5–10 cm so the strip hangs with a slight droop and can spin.
- Tape faded after only a few months: UV exposure was high, or you are in a coastal environment. Switch to a UV-stabilised product and inspect monthly instead of quarterly.
- Neighbours are complaining about tape appearance: Switch to narrower tape (11–15 mm) which is less visually dominant, and confine runs to the immediate perimeter of the protected area rather than covering a wide visual field.
Safety, legal, and aviation considerations
Legal protection of birds
In the United States, most wild bird species are protected under the Migratory Bird Treaty Act (MBTA), which prohibits harming, killing, or intentionally causing nest abandonment without a federal permit. Non-injurious deterrence, which is what correctly installed reflective tape is, is generally permitted. However, if you discover an active nest with eggs or chicks at your site, do not install tape or other deterrents that could cause the adults to abandon the nest until the nesting cycle is complete. If you are unsure whether a species is protected, contact your state wildlife agency before acting. Outside the US, equivalent legislation applies in Canada (Migratory Birds Convention Act), the UK (Wildlife and Countryside Act), and most EU member states.
Aviation and near-airport sites
If your property is near an airport, aerodrome, or regular flight path, bird management becomes a shared safety responsibility. FAA and USDA wildlife services guidance lists reflective tape among visual deterrents that may be used in airport wildlife programs, but it must be deployed as part of a formal Wildlife Hazard Management Plan administered by trained personnel. Tape alone is explicitly not considered a long-term solution for aviation bird hazards. If you are managing bird pressure on or near an airfield, work through the airport wildlife program coordinator, not independently. Transport Canada's technical review (TP13029) reaches the same conclusion: integrated, site-scale programs are required, and individual visual deterrents are supporting tools, not standalone solutions.
Material safety
BoPET film has low acute toxicity under normal handling. The main physical hazards are sharp film edges (wear gloves when cutting large quantities) and flammability: Mylar is a combustible plastic film and should not be installed near open flames, barbecues, or fire pits. Do not leave offcuts or spent tape on the ground where wildlife or pets could ingest them. Dispose of old tape in general waste; BoPET is not accepted in most kerbside recycling streams.
Combining tape with other deterrents
Tape works best as one element in a layered approach, not as a standalone solution. University extension sources and peer-reviewed literature consistently recommend combining visual devices with auditory deterrents (predator calls, distress calls) and physical exclusion to produce results that last longer than the typical weeks of effectiveness you get from tape alone.
A practical layered approach for a residential garden might look like this: reflective or holographic tape on the perimeter (for initial deterrence), a battery-powered predator call device set to cycle calls randomly (for sustained auditory pressure), and bird netting over the highest-value plants such as berry bushes (for physical protection). Rotating the tape position every 10–14 days and varying the call schedule slows habituation considerably.
For commercial or high-value contexts, such as a large fruit operation, rooftop facility, or solar installation, physical exclusion should be the primary method, with tape serving as a low-cost early-warning perimeter while permanent barriers are installed. The solar industry position is particularly clear on this: critter-guard mesh is the only reliably durable solution for under-panel nesting, and tape is a short-term stopgap at best.
When to call a professional
DIY tape installation is appropriate for most residential and small-scale commercial situations. Consider bringing in a licensed pest management or bird control professional when you are dealing with a nesting colony (especially of protected species), when you are near an airport or critical infrastructure, when the site involves significant height or access risk, when previous DIY attempts have failed and the bird problem is causing structural damage or health hazards from droppings, or when your jurisdiction requires a permit for the species or deterrent method you are considering.
FAQ
What is reflective (holographic/blinder‑style) bird tape and how does it work?
Reflective bird tape is a thin, often iridescent polyester (BoPET/Mylar) or foil ribbon that flashes light and moves in the wind to create visual (and sometimes audible) stimuli. The sudden flashes, shimmer, and the noise of strips flapping can startle or disrupt bird behavior, reducing loafing, foraging, and some feeding damage—typically for short periods. Effects are species‑ and context‑dependent and usually work best when used over small, well‑defined areas or integrated with other deterrents.
Which birds are most and least likely to be deterred by reflective tape?
More likely: some small to medium passerines (starlings, sparrows), certain foraging gulls at loafing/foraging sites, and some migratory species that avoid novel visual stimuli. Less likely: nesting gulls, many pigeons and urban-adapted birds, corvids and large gull colonies where habituation or food/shelter rewards remain. Habituation (birds getting used to the tape) commonly develops within days to weeks unless stimuli are changed or combined with other methods.
Is there evidence that reflective tape reduces bird damage?
Yes, field and extension studies report reductions in bird activity and crop damage in some contexts (small plots, parallel‑row deployments, protected entry points). Classic trials (e.g., Bruggers et al.) and extension bulletins show effectiveness can be real but variable; results depend on species, site, tape density, and whether entry points are excluded. Scientific and agency reviews emphasize tape is often a short‑term tool and performs best when part of a multimodal program.
How do I choose the right type of tape for my site?
Choose based on durability, reflectivity and surface use: - Holographic/iridescent BoPET (Mylar) tape: very reflective, visible at distance, good for trees, fences, docks, short‑term crop protection. - Blinder/metallic foil tape: louder when flapping, good where sound reinforcement helps. - UV‑enhanced variants: marketed as more visible to birds. - Double‑sided reflective tape: useful when strips may twist. Consider UV/weather resistance and manufacturer‑rated lifespan; for long exposures, choose UV‑stabilized or heavier gauge products. For high‑salt or very sunny sites, expect faster degradation.
What attachment hardware/materials should I use?
Common hardware: nylon cord/monofilament, UV‑resistant zip ties, stainless‑steel or plastic clips, small‑eye screw anchors, adhesive mounting clips for glass, and lightweight stakes for gardens. Use corrosion‑resistant fasteners on roofs or near saltwater. Avoid adhesives or fasteners that void warranties (e.g., on solar panels or certain roof membranes). For permanent or critical surfaces, consult the surface owner/installer before drilling.
How do I install tape on common residential surfaces (patios, balconies, windows, fences, gardens)?
General rules: fasten securely, allow free movement, and avoid creating hazards. Examples: - Patios/balconies: run lines from overhead beams/gutters at 0.5–1 m above the area birds use; anchor ends with eye screws or clips; space strips every 0.5–2 m depending on bird pressure. - Windows: attach short vertical strips inside a narrow gap or on exterior frames using removable adhesive clips; place strips 10–15 cm apart to break reflection/skyline to reduce collisions. - Gardens/vegetable beds: suspend alternating strips on monofilament 0.5–1 m above plants in parallel rows or perimeter lines 3–5 m spacing for larger plots; small plots need denser spacing. - Fences: tie strips along top rail every 0.5–2 m so they hang and flutter.
Next Articles
How to Hang Bird Repellent Tape: Step-by-Step Guide
Step-by-step guide to hang bird repellent tape, choosing placement, spacing, mounting tips, and maintenance for lasting
How to Use Bird Repellent Tape Step by Step Guide
Learn how bird repellent tape works and apply scare tape to ledges, gutters, and rails with spacing, safety, and trouble

How to Use Holographic Bird Scare Tape Step by Step
Step-by-step guide to use holographic bird scare tape: placement, mounting, coverage, limits, and fixes if birds return.