You can install bird spikes on an AC unit using either outdoor-grade adhesive, screws, or a combination of both, depending on the surface. The key is covering every flat edge, corner, and top surface where birds can get a foothold, without puncturing refrigerant lines, blocking airflow through the condenser coils, or working near energized electrical components. Done right, this is a straightforward DIY job that takes under an hour and lasts for years. If you follow the right steps and placement tips, do it yourself bird spikes can be a practical DIY solution for keeping birds off your AC condenser.
How to Install Bird Spikes on an AC Unit Safely

Marcus Weatherby
4 Jul 2026
Are bird spikes actually a good fit for AC units?
Yes, and they're one of the more practical solutions for this specific problem. AC condensers (the outdoor box units) give birds exactly what they're looking for: a flat, elevated surface that's warm, sheltered, and close to a building. Pigeons, starlings, and sparrows all treat the top and side edges of condenser units as prime roosting spots.
Bird spikes work by removing the stable landing surface. The projections aren't designed to injure birds, they just make it physically impossible to stand comfortably. Bird-X’s Stainless SPIKES are stainless-steel needle strips on a UV-inhibited polycarbonate base meant to deny landing and roosting by making the surface uncomfortable to stand on projections aren't designed to injure birds, they just make it physically impossible to stand comfortably.. For AC units specifically, stainless steel spikes on a polycarbonate base (like Bird-X's Stainless SPIKES or Nixalite's Premium line) are the right call. They're corrosion-resistant, hold up in sun and rain, and don't conduct electricity or heat in a way that creates secondary problems.
The one thing spikes can't do is block small birds from nesting inside the unit itself, through the grille openings. If that's your issue, mesh or netting over the housing is worth looking into alongside spikes. But for perching and roosting on top of and around the condenser, spikes are the right tool.
What you need before you start
Choosing the right spike type
For AC units, go with a narrow-base spike strip in the 3-to-5-inch wide range. Most condenser tops and edges don't give you a lot of flat surface to work with, so a narrow base fits better and leaves the grille area clear. Stainless steel projections on a UV-inhibited polycarbonate base are the standard, products like Bird-X Stainless SPIKES use ST302 surgical-grade stainless, which resists rust even when exposed to condensation and weather year-round.
Skip plastic-only spikes for this application. The heat cycling near a condenser, especially in summer, will degrade cheaper plastic projections faster than on a shaded ledge. All-stainless options like Nixalite's Premium line are worth the extra cost for HVAC applications.
Tools and materials checklist
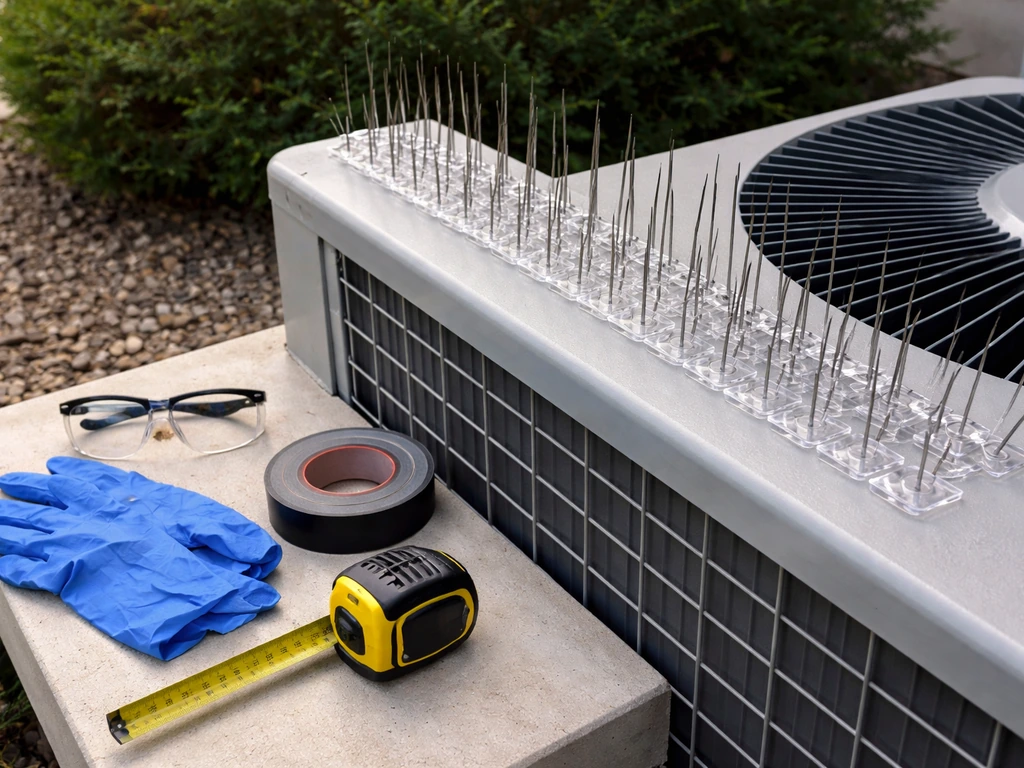
- Bird spike strips (stainless steel projections, polycarbonate base, narrow base width)
- Polyurethane outdoor adhesive or 3M VHB tape (model 5952 or equivalent) for adhesive mounting
- Stainless screws (if your spike base has pre-drilled holes and your surface allows mechanical fastening)
- Wire cutters or tin snips to trim spike strips to length
- Tape measure and pencil or chalk marker
- Rubbing alcohol or surface cleaner and a clean rag
- Work gloves (the projections are sharp)
- Safety glasses
- Sturdy step ladder appropriate for the height of your unit
Safety first: power, ladders, and building rules
This step is non-negotiable: turn off the AC unit and disconnect it at the disconnect box before you touch anything. The disconnect box is usually mounted on the wall near the condenser, it's a small weatherproof box with a pull-out fuse block or breaker. Pull it out or flip it off. OSHA's lockout/tagout principles apply here: you want to confirm the unit is de-energized before working around it, because a unit that kicks on mid-install is a real hazard. Triple-check that the thermostat is set to off and the disconnect is open before you reach over the housing.
Set your ladder on level ground and make sure it's rated for your weight plus tools. Don't lean directly over the unit, work from the side so you have stable footing. Avoid pressing down on the condenser top or grille housing, since the fins underneath are fragile and bend easily.
If you're in a condo, apartment complex, or managed property, check with your building manager or HOA before installing anything. Some properties require professional installation or prohibit modifications to HVAC equipment. For roof-mounted units, the safety and permitting considerations get more involved, that scenario is covered in more depth in the guide specifically covering roof installations.
One more thing: don't install spikes in rain or high winds. For roof installations, focus on safe ladder positioning and proper placement so the spikes do their job without affecting airflow don't install spikes. Adhesive won't cure properly on a wet surface, and working on a ladder in wind is a fall risk.
Step-by-step installation on your AC unit
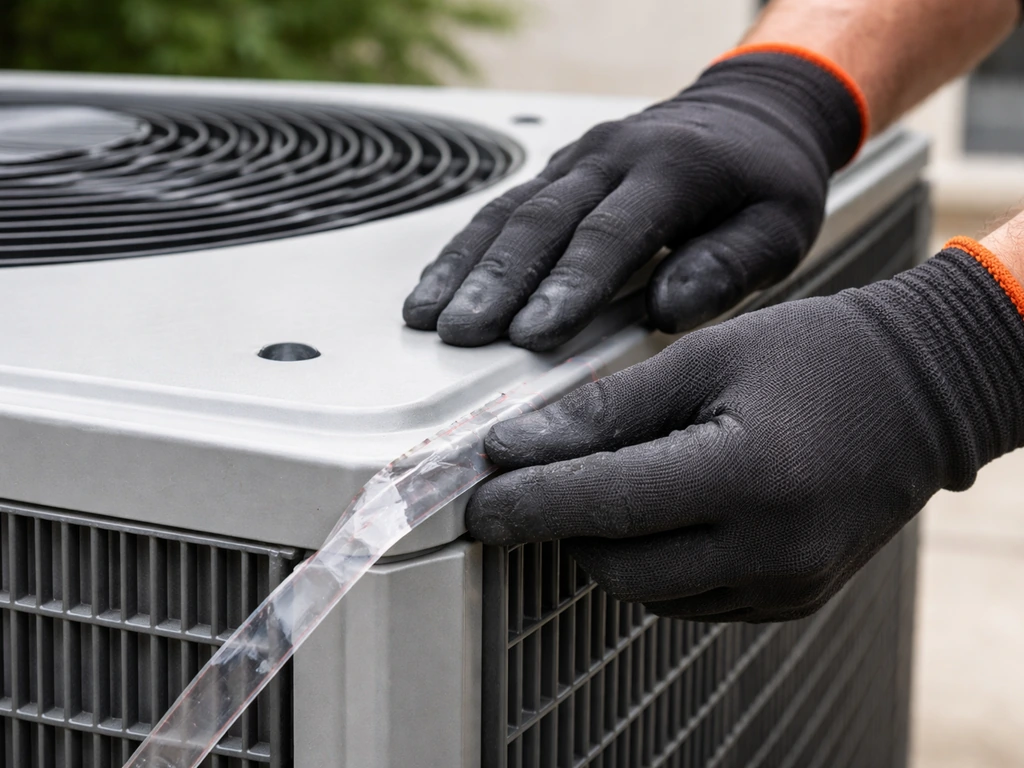
- Turn off the AC unit at the thermostat and open the disconnect box to cut power to the condenser. Confirm the unit is off before proceeding.
- Put on your work gloves and safety glasses. Spike projections are sharp and can cause cuts without warning, especially when handling strips in tight angles.
- Measure the top edges, side rails, and any flat surfaces around the unit where birds are landing. Write down each length so you can cut strips to fit.
- Cut spike strips to length using tin snips or wire cutters. Most strips are designed to be cut at the base between projection rows — check your product's instructions for the correct cut points.
- Clean every surface you plan to attach spikes to. Wipe down with rubbing alcohol and let it dry completely. Adhesive won't bond properly to dusty, oily, or condensation-wet metal.
- If using adhesive: apply a bead of polyurethane outdoor adhesive or 3M VHB tape along the bottom of the spike strip base. Many spike bases include a built-in glue channel (a trough) to hold the adhesive in place — use it.
- Press the spike strip firmly onto the cleaned surface, holding it down for 30 to 60 seconds. The adhesive needs contact pressure to start bonding.
- If your spike base has pre-drilled holes and you're mounting on a painted metal rail or frame (not the condenser housing itself), you can supplement with stainless screws every six inches. Do not screw into the condenser housing, refrigerant lines, or any panel that could compromise the unit's sealing.
- Work your way around the unit, covering all target surfaces without leaving gaps between strips. Butt each strip end tightly against the next.
- Let adhesive cure for the time specified by the manufacturer (typically 24 hours) before turning the unit back on.
Where to actually place the spikes
Birds don't just land on top of the unit. They use every stable edge and flat surface they can find. Missing even one perch point means they'll shift and still use the unit. Here's where to focus:
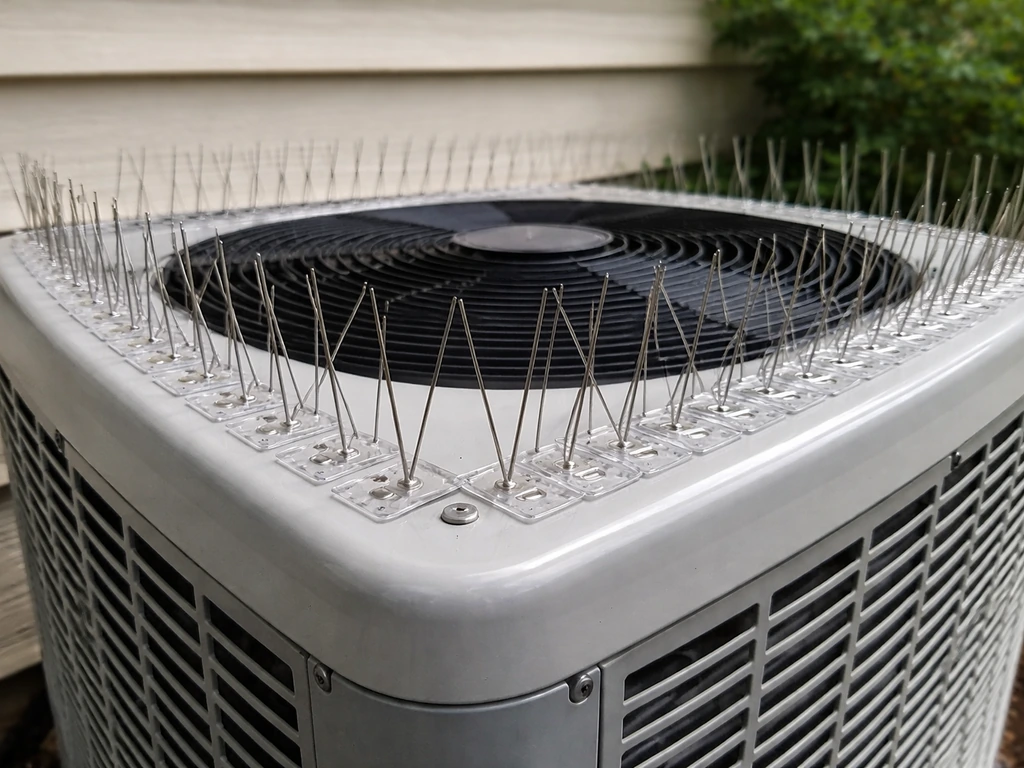
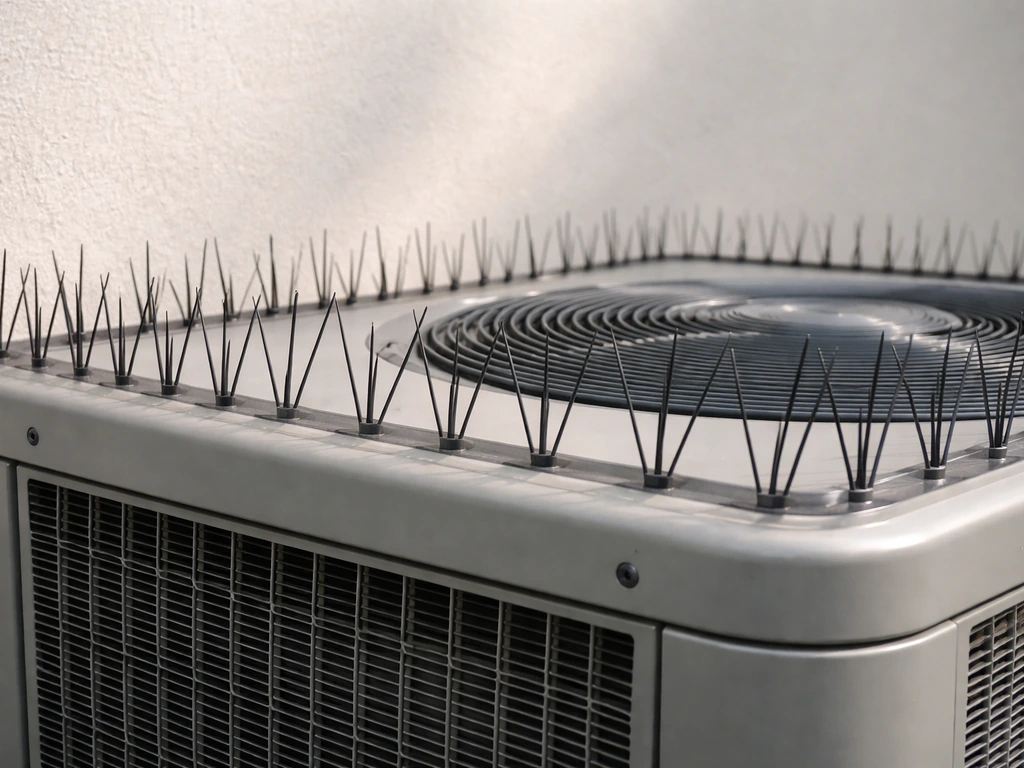
- Top surface of the condenser housing: the primary target. Cover the full perimeter with spike strips running along every edge. If the top grille is flat and wide enough, add strips in parallel rows spaced no more than 4 to 5 inches apart.
- Top side rails and frame edges: the metal lip or frame around the housing edge is a favorite perch. Run a strip along the entire length of each side rail.
- Corner transitions: birds like corners because they're stable on two sides. Spike strips can be bent slightly at the corner, or you can use two short cuts meeting at the corner edge to cover it.
- Any horizontal overhang or conduit bracket: if there are pipe brackets, electrical conduit supports, or small shelves near the unit, add a strip to those surfaces too.
- Top of the disconnect box housing (if birds land there): small, flat surfaces like disconnect box tops are easy to overlook and easy to spike.
What you want to avoid is placing spikes in a way that blocks airflow through the condenser coils or that sits over the fan grille. The top center of most condensers is a fan exhaust, keep spikes along the edges and frame, not laid flat over the fan opening. The unit needs that airflow to operate.
Height of the projections also matters. Standard spike strips with projections ranging from 3 to 5 inches tall work well for most perching birds. If you're dealing with larger birds like pigeons, go with the taller end of that range. Shorter projections are fine for small sparrows but pigeons can step over them with effort.
Comparing adhesive vs. screw mounting for AC surfaces
| Mounting method | Best for | Pros | Cons |
|---|---|---|---|
| Polyurethane adhesive | Painted metal rails, coated housing surfaces | No holes drilled, won't damage housing, works on curved surfaces | Takes 24 hours to cure, bond can weaken if surface prep is skipped |
| 3M VHB tape (e.g., 5952) | Smooth flat metal surfaces, short strips | Fast application, strong bond on clean metal | Less effective on textured or painted surfaces, not ideal in extreme heat |
| Stainless screws (every 6 inches) | Mounting rails, concrete pads, bracket frames near unit | Very secure, won't loosen over time | Requires drillable surface, never use on condenser housing itself |
| Adhesive + screws combined | Mounting rails with pre-drilled base holes | Maximum security, belt-and-suspenders approach | More labor intensive, surface must support both methods |
For most residential condenser units, polyurethane adhesive alone is the most practical method. It bonds well to the coated metal surfaces typical of condenser housings, doesn't require drilling into the unit, and holds up through heat cycles and weather. Use screws only where you have a proper frame or rail to mount into, never screw into the condenser panels themselves.
Keeping spikes in place and knowing when to check them
Bird spikes on an AC unit are relatively low maintenance, but they're not zero maintenance. The mounting adhesive can weaken over time from heat cycling, UV exposure, and moisture, and the unit itself gets moved or serviced occasionally, which can knock strips loose.
Inspect the spikes after any major weather event, such as a heavy storm, strong wind, or hard freeze. Those are the conditions most likely to loosen adhesive bonds or shift strips out of position. When you check, press firmly on each strip to test whether it's still bonded solidly. Any strip that has any give or movement should be re-glued immediately, a loose strip is worse than none because it can rattle against the housing and create a new problem.
Clean the strips once or twice a year. Bird debris, dust, and cottonwood buildup can accumulate on the base and actually give birds a surface to stand on despite the spikes. A spray with a garden hose or a wipe-down with a damp cloth is usually enough.
If the condenser unit gets serviced or the housing panels are ever removed by an HVAC technician, let them know about the spikes beforehand. Some strips may need to come off temporarily for service access and then get re-attached. Keep a few extra strip sections on hand for this reason.
Stainless steel projections on a quality polycarbonate base should last 10 years or more outdoors. If you start seeing projections bent flat, bases cracking, or corrosion on cheaper strips, it's time to replace the affected sections. Replacing individual strips is much cheaper than a full reinstall, and it keeps your coverage consistent. If you want to budget, the installation cost depends on your AC size and whether mounting materials and labor are needed how much to install bird spikes.
Common mistakes and how to fix them
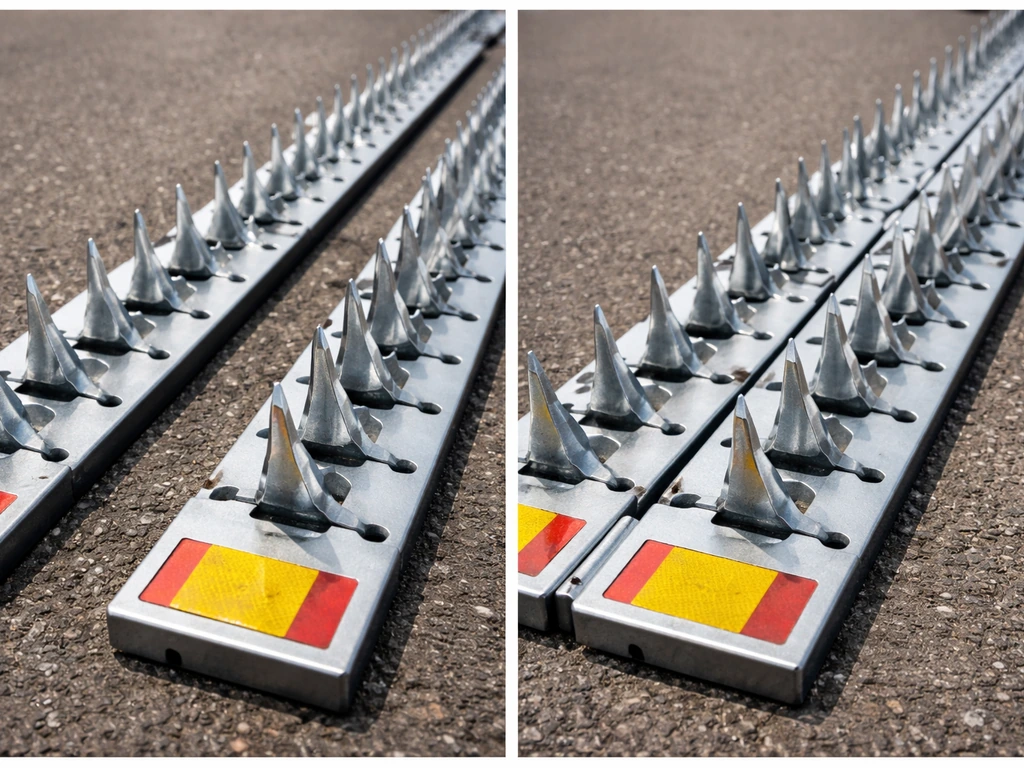
- Gaps between strips: even a 2-inch gap gives a small bird a landing spot. Butt strip ends tightly together or overlap slightly at joints.
- Spikes only on top, nothing on the edges: birds will just shift to the rail edges and frame. Cover every horizontal surface, not just the top.
- Skipping surface prep: adhesive applied to dusty or damp metal will peel within weeks. Clean and dry the surface thoroughly before applying anything.
- Blocking the fan exhaust: placing strips over the fan opening will restrict airflow and can damage the unit. Keep spikes on the perimeter frame only.
- Using the wrong adhesive: basic construction adhesive or silicone isn't rated for the temperature swings near an HVAC unit. Use polyurethane outdoor adhesive or 3M VHB specifically.
- Projections too short for the bird species: if pigeons are still landing despite the spikes, you may have strips designed for smaller birds. Upgrade to a taller-projection model.
- Not turning off the unit: working near energized electrical components on the condenser is a serious safety risk. Always disconnect before starting.
FAQ
Can I install bird spikes on my AC unit if I do not have an outdoor-grade adhesive or access to a drill?
Yes, but your placement choices change. If you cannot drill, plan for a narrow-base strip that bonds well to the coated housing surfaces, and apply the adhesive only to dry, clean metal. Avoid trying to glue to dusty fins, painted corners with flaking coating, or any area that can get wet and trap moisture under the base, since those spots are where strips commonly lift.
Where exactly should the spikes stop so I do not interfere with condenser airflow?
Keep spikes off the fan exhaust area and any region that could disrupt the air path, including spaces around the fan grille and the center discharge opening. A practical rule is to place spikes along the stable perimeter edges and outer frame sections, leaving the top center and the full fan grille area clear, then verify you can visually see airflow path from typical sides.
Do bird spikes work if birds are roosting on the side access panels instead of the top?
Often yes, as long as you cover the specific ledges they use. Side perching usually happens on trim edges, cabinet seams, and corners where a foot can grip. Use shorter sections on vertical-ish edges and corners rather than running long strips across panel faces where they might peel due to curvature or repeated vibration.
How do I tell the difference between “installing” and “blocking” when spikes go near the grille?
Check two things before committing: (1) the spikes should not overlap openings intended for airflow or intake, and (2) there should be no base material that bridges across mesh or grille spaces. If you have to push the strip over a grille line to make it fit, that area is likely too close, reposition along the frame instead, and use smaller cut-to-length sections.
What if my AC condenser has rust, loose paint, or flaking coating where I want to mount the spikes?
Adhesion will be poor on unstable surfaces. Remove loose paint and rust, wipe the area clean, and let it fully dry before applying adhesive. If the surface is severely damaged or pitted, you may need a different mounting method (for example, attaching to a solid rail) or professional help to avoid strips lifting.
Is it okay to install spikes directly over screw heads or seams?
Generally no if they prevent the base from sitting flat. Adhesive bonds best to continuous, stable contact. If a seam or fastener head creates a bump, use a cut section that bridges beside it, or mount along the adjacent flat edge. Otherwise you risk a “floating” base that will loosen first in heat cycling.
How soon can the AC run after I install the spikes with adhesive?
Let the adhesive cure fully before turning power back on or running the unit, especially in humid conditions. Many outdoor adhesives require more than just “touch dry” time. If the label or product instructions are not available, wait longer rather than shorter, and avoid inspecting or pressing on the strip during the initial cure window.
Will spikes stop birds from nesting inside the unit through the openings?
Not reliably. Spikes address landing and perching on external surfaces, they do not seal internal nesting paths through fan grilles or cabinet openings. If you are seeing evidence of nesting inside, combine spikes with netting or mesh over the housing openings, and ensure the covering still allows proper airflow and does not trap debris.
Can I use regular plastic spikes on an AC condenser?
It is not ideal. Plastic-only products can degrade faster under heat cycling and weather exposure, and degraded tips can become less effective or break off. For HVAC applications, prefer stainless steel spikes on a UV-inhibited polycarbonate base, or an all-stainless option if your area has heavy sun, condensation, or frequent freezes.
How do I handle a situation where the unit gets serviced and the technician needs access to panels?
Plan for temporary removal and reattachment. Before service, point out the exact strip locations and keep spare sections or extra adhesive so you can reinstall quickly after the technician finishes. Also ask whether the service procedure might disturb the cabinet seams, since that can break adhesive bonds even if panels look intact.
What maintenance checks should I do after storms or freezes?
After major wind, heavy rain, or hard freezes, check strip edges and press each section to confirm there is no lift or side-to-side movement. Look for shifted coverage gaps, curling bases, and any debris buildup under the base that can create a new perch surface. Re-glue anything that moves promptly.
If a strip starts to peel, should I remove it completely or can I just re-adhere the loose section?
Re-adhere only after you clean and prepare the contact surface. Remove the loose section, wipe off any old adhesive residue, let the area dry, then apply fresh outdoor-rated adhesive. Spot-fixing over remaining weak residue often fails again quickly due to heat and moisture cycling.
Do I need permission from an HOA or condo for bird spikes on an AC unit?
Often yes, especially on managed or multi-unit properties. Even when spikes seem minor, some rules treat any modification near HVAC equipment as an alteration requiring approval, or they require licensed installation. Check before starting, and if approval is needed, keep a simple description of the mounting method (adhesive, no drilling into panels) for faster review.
Are bird spikes safe for the AC if they are installed correctly near electrical parts?
They can be, if you keep work zones away from energized components and you follow the power-off process. Avoid reaching across wiring or controls, and do the work from a stable position so you do not bump electrical panels. If the unit has complex access panels, pause and verify access points are de-energized before placing any strips.
How long should the installation last, and when should I replace instead of re-gluing?
Quality stainless on a UV-inhibited polycarbonate base can last a decade or more outdoors. Replace sections when you see bent or flattened projections, cracked bases, widespread corrosion at the base edges, or repeated peeling after re-gluing. If multiple sections fail within the same area, it usually indicates a surface adhesion problem that needs better preparation or a different mounting location.
Next Article
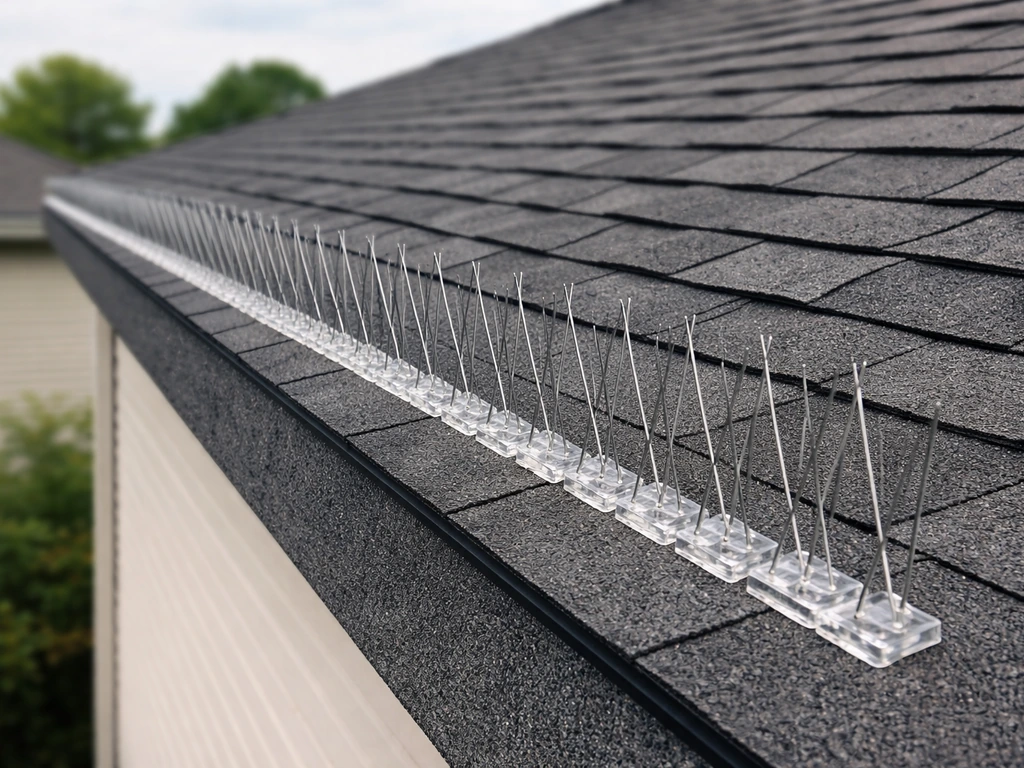
How to Install Bird Spikes on Roof: Shingles vs Tile
Step-by-step guide to install bird spikes on shingle or tile roofs, with placement, attachment, sealing, and safety tips