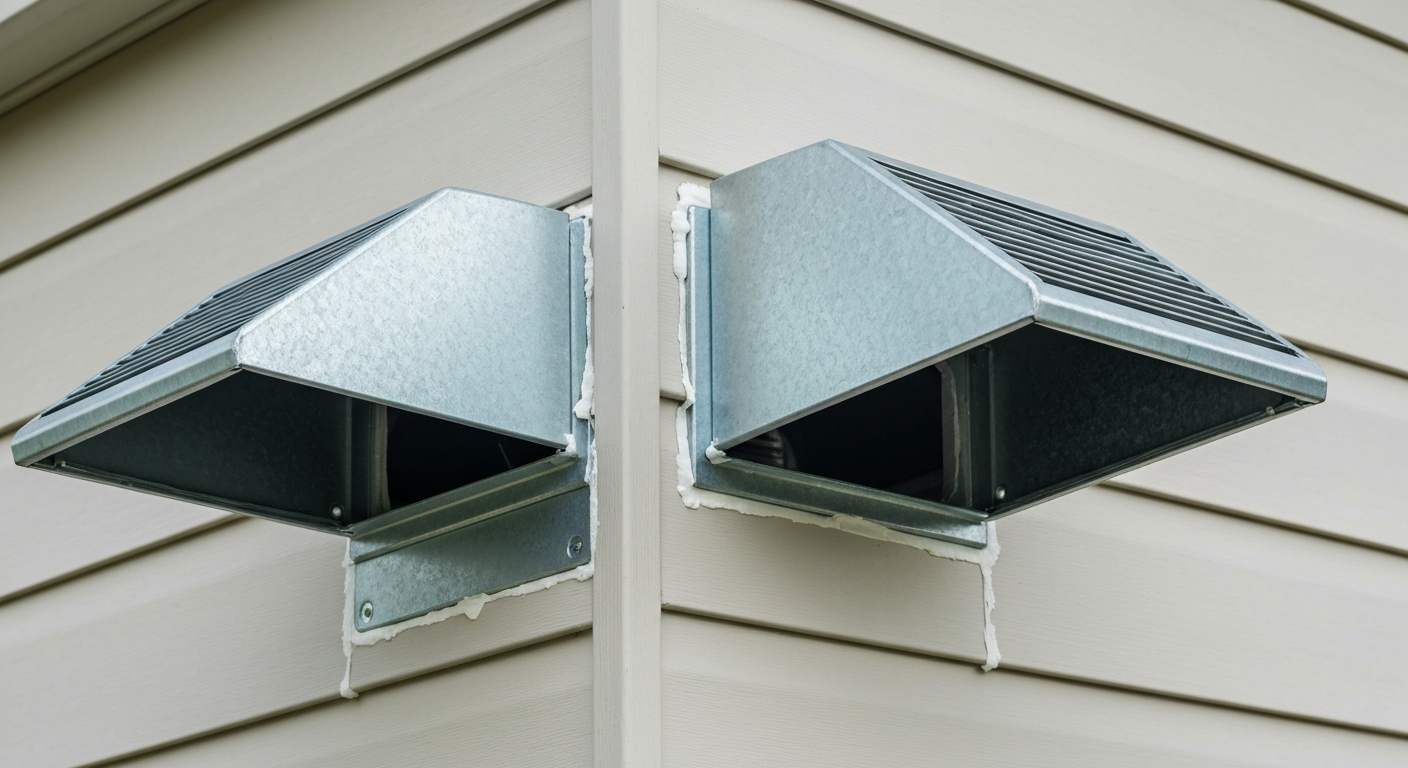
Installing a dryer vent bird guard means fitting a purpose-built cover over the exterior end of your dryer's exhaust duct to block birds, rodents, and other pests from entering, while still letting hot, lint-laden air escape freely. The right guard stops nesting before it starts, reduces fire risk from debris buildup, and keeps your dryer running at full efficiency. Done correctly it takes about 30 to 60 minutes with basic tools. Done wrong, it can restrict airflow, violate building codes, and turn a pest problem into a fire hazard.
How to Install Dryer Vent Bird Guard: Complete DIY Guide

Marcus Weatherby
7 Aug 2026
What bird proofing a dryer vent actually means
Bird proofing a dryer vent is an exclusion strategy. You are physically blocking entry points using durable, weather-resistant hardware so pests cannot get inside the duct. For dryer vents specifically, that means replacing or supplementing a loose or broken termination cap with a guard that combines a working back-draft damper (to stop cold-air backdraft and pest entry when the dryer is off) with a housing that does not trap lint when the dryer is running. For a general definition of the term, see what is bird proofing.
The key word is exclusion, not just deterrence. A visual scare device on your roof will not stop a house sparrow from nesting inside a warm duct. A well-fitted, mechanically sound guard will. This is the same principle used across other bird-proofing applications, from solar panels to rooftop vents, but dryer exhaust adds a unique constraint: building codes and manufacturer instructions explicitly prohibit fine-mesh screens at the duct termination because lint accumulates and creates a fire risk.
Why you actually need a bird guard on your dryer vent
Birds, especially house sparrows and starlings, actively seek out dryer vent openings. The duct is warm, sheltered, and often has a gravity-flap damper that sits slightly open or fails over time. Once a pair moves in, they pack the duct with grass, feathers, and debris. That nest material is flammable, and it blocks the airflow your dryer depends on.
The fire statistics behind this are worth taking seriously. NFPA research covering 2010 to 2014 estimates about 15,970 U.S. home fires per year involved clothes dryers or washing machines, with lint as the leading item first ignited in dryer fires and failure to clean the duct as the leading contributing factor in roughly one in three of those fires. A nest crammed into the duct is essentially a pre-loaded lint trap. It restricts exhaust flow, raises dryer operating temperatures, and gives a spark something to catch.
Beyond fire, a nest in your duct brings mites, lice, and other parasites into the wall cavity. Rodents that follow the same opening can chew through duct material. And a blocked or partially blocked exhaust duct makes your dryer work harder, extending cycle times and increasing energy costs. A quality bird guard addresses all of these problems at once.
Safety, dryer performance, and building codes you need to know first
Before you buy anything, understand the code constraint. The International Residential Code (IRC M1502) is explicit: dryer exhaust shall terminate outdoors, shall have a back-draft damper, and screens shall not be installed at the duct termination. The minimum free opening area required at the termination is 12.5 square inches. This is why a standard hardware-cloth cage bolted over the vent opening is not a compliant solution, even though it would stop birds. It will also catch lint, reduce free area below the minimum, and eventually become a fire hazard.
Local jurisdictions adopt and sometimes amend the model IRC. Some states are a version or two behind. Check your local building department, or use a code search tool such as UpCodes or the ICC Code Adoption Map, to confirm which edition applies to you and whether any local amendments affect dryer exhaust termination requirements.
On the performance side, every added component in the exhaust path creates pressure drop. A back-draft damper, a hooded cap, an elbow, a length of duct: these all add up. Major manufacturers (Whirlpool, LG, Samsung, GE) publish maximum duct-length charts that account for the type of wall cap used. LG's builder spec sheets, for example, show that a standard wall cap with hinged dampers allows around 65 feet of rigid duct with no elbows, with a deduction of roughly 6 feet per 90-degree turn. Adding a guard with higher resistance than the cap it replaces effectively shortens your allowable duct run. If your installation is already near the maximum, choose a guard with the highest free-area rating you can find.
The CPSC has also confirmed that lint is combustible and that restricted exhaust paths elevate dryer operating temperatures. Any guard you install must preserve the duct's ability to move hot, moist, lint-laden air to the outside without restriction or accumulation points.
How to choose the right guard for your situation
The correct guard depends on your vent type, duct diameter, wall material, and pest pressure. Here are the criteria to work through before you order anything.
- Vent type: wall cap (louvered or hooded), roof cap, soffit cap, or flexible duct termination. Each has different guard options.
- Duct diameter: the vast majority of residential dryer ducts are 4 inches nominal. Confirm before buying, as 3-inch or 3.25-inch ducts appear on older homes.
- Material and corrosion resistance: aluminum or galvanized steel outlast plastic in UV exposure and resist the heat and moisture of dryer exhaust. Plastic caps become brittle after several years and are more likely to fail, letting dampers stick open.
- Airflow rating and free open area: the guard must maintain at least 12.5 square inches of unobstructed passage per IRC M1502. Manufacturer datasheets should state the free area; if they do not, measure the open portions of the damper yourself.
- Mesh size (if any mesh is included): per PNNL/Building America guidance, 1/2-inch hardware cloth is the minimum mesh size for bird and rodent exclusion. Do not use finer mesh on a dryer exhaust termination. Many code-compliant dryer vent guards use no mesh at all, relying on close-tolerance damper louvers and a hooded housing geometry to exclude birds.
- Lint and fire safety: avoid any guard design that creates horizontal ledges or recesses where lint can collect. Smooth interior surfaces are required by code for duct work (IRC/IMC), and the same logic applies to the termination fitting.
- Local code compliance: confirm the product meets IRC M1502 or your local equivalent before purchasing.
- Fastening system: the guard must attach securely to the wall or roof surface. Loose caps vibrate, wear out damper pivot pins faster, and can fall off in wind. Look for models with screws directly into the housing flange, not just friction fit.
- Warranty: commercial-grade or stainless steel guards typically carry 5- to 10-year warranties. Plastic budget caps may have one year or none.
Guard types compared: what works and what to avoid
There are four main guard types in common use. Each has real tradeoffs for bird exclusion, airflow, lint safety, and installation complexity.
| Guard Type | Bird/Pest Exclusion | Airflow / Free Area | Lint Safety | Fire Safety | Best For |
|---|---|---|---|---|---|
| Louvered/gravity-flap wall cap | Moderate (damper closes at rest but can be forced open by larger birds) | Good when damper operates freely | Good if damper swings fully open during operation | Good if kept clean | Standard wall installations, short duct runs |
| Hooded through-wall cap with hinged damper | Good (hood geometry physically discourages entry; damper adds second barrier) | Good to excellent depending on damper design | Good (smooth interior, no ledges) | Good | Most residential wall terminations, recommended by LG/Samsung |
| One-way / pest-proof flap guard (spring-loaded or magnetic close) | Excellent (tight seal when dryer is off; fully open during operation) | Excellent when open | Good (no mesh to clog) | Good | High-pest-pressure situations, coastal or wooded settings |
| Integrated hooded cap with coarse louvers (no fine mesh) | Good (louver spacing typically 1/2 inch or larger) | Good | Good | Good | Retrofit on existing duct openings |
| Fine-mesh cage or screen (hardware cloth over opening) | Excellent for exclusion | Poor (clogs with lint rapidly) | Very poor (lint accumulation) | High risk (lint ignition) | NOT RECOMMENDED for dryer exhaust terminations |
| Stainless steel guard (any of above types) | Same as type chosen | Same as type chosen | Same as type chosen, plus resists corrosion longer | Excellent (high heat tolerance) | Coastal, humid, or high-UV environments; long-term installs |
| Plastic/PVC guard | Same as type chosen when new | Same as type chosen when new | Adequate when new, degrades over time | Adequate, but lower heat tolerance | Low-cost retrofit, mild climates, short service life expected |
The practical recommendation: for most homes, a hooded aluminum or galvanized steel wall cap with a spring-loaded or magnetic-close hinged damper is the best combination of bird exclusion, code compliance, airflow, and lint safety. For recommended models and ratings, see our guide to the best dryer vent bird guard. For specific model recommendations and buying guidance, see our roundup of the best bird proof dryer vent options. For product recommendations, see our guide to the best bird deflectors for top-rated, code-compliant caps and models. If pest pressure is very high (active nesting history, coastal wetlands, wooded lots), step up to a one-way spring-loaded pest-proof cap in stainless steel. Avoid fine-mesh cages on dryer exhausts entirely, regardless of what you may find marketed online.
Tools and materials checklist
- Replacement dryer vent bird guard (sized to your duct diameter, code-compliant type as described above)
- Tape measure and pencil
- Caulking gun and exterior-grade silicone or paintable latex caulk (mold/mildew resistant)
- Screwdriver (Phillips and flathead) or cordless drill with appropriate bits
- Galvanized or stainless sheet-metal screws (1-inch, for securing guard flange to wall)
- Utility knife
- Wire brush or stiff-bristle brush (for cleaning lint from duct end before fitting new guard)
- Vacuum with narrow hose attachment (to remove lint and nest debris from duct)
- Ladder (appropriate height for your vent location)
- Safety glasses and work gloves
- Dust mask or N95 respirator (bird droppings and nest debris carry pathogens)
- Foil-backed metal duct tape (not standard cloth duct tape) for sealing duct joints
- Headlamp or flashlight (for inspecting inside the duct before and after)
- Replacement sheet-metal screws or duct clamps if existing ones are rusted
- Optional: borescope or phone camera on a stick to inspect further into the duct run
Measurements you need before you buy
Getting the measurements right before you order saves a second trip to the hardware store. Here is what to measure and typical values for residential installations.
| Measurement | What to Measure | Where to Measure | Typical Residential Value | Notes |
|---|---|---|---|---|
| Duct nominal diameter | Inside diameter of the exhaust duct at the termination | At the duct end, inside the current cap | 4 inches (100 mm) | Older homes may have 3-inch or 3.25-inch duct; measure do not assume |
| Wall cap collar/spigot size | Outside diameter of the cap's duct collar (the part that inserts into or over the duct) | Cap product specs or measure old cap | Typically 4-inch nominal (4.0–4.1 inches OD) | Must match duct ID; too loose allows air and pest bypass |
| Wall/roof surface opening diameter | Diameter of the hole in the wall or roof deck | At the wall face or roof deck | 4.25 to 4.5 inches (to allow collar insertion) | Wider than duct OD to allow collar to seat flush |
| Guard faceplate / flange width | Width of the guard's mounting flange | Guard product specs or measure old cap flange | 6–8 inches square or round (varies by brand) | Flange must fully cover the wall opening and allow 4-corner fastening |
| Minimum free open area at termination | Total unobstructed area of the damper/louver opening when fully open | Calculate from damper dimensions or check product datasheet | Minimum 12.5 in² per IRC M1502 | Non-negotiable; reject any product that does not meet this |
| Distance from vent to nearest obstructions | Clear space around the guard for exhaust discharge | At the exterior wall face | Minimum 12 inches from corners, grade, or landscaping (check local code) | Low clearance forces exhaust back toward wall, accelerating deterioration |
| Total duct run length | Measured from dryer connection to termination, including equivalent length for elbows | Inside the house; add ~6 ft per 90° elbow | Typically 10–35 ft for most homes | Needed to confirm guard pressure drop does not exceed manufacturer's max run length |
Step-by-step installation by vent type
Before starting any vent work, disconnect the dryer from power (or gas and power for gas dryers). If you suspect an active nest, stop work and read the section on dealing with occupied nests below before proceeding.
Standard wall cap (louvered or hooded)
- From outside, remove the existing wall cap. Most are held by two to four sheet-metal screws through the flange into the siding, plus a bead of caulk. Cut the caulk with a utility knife, remove screws, and pull the cap straight out from the wall.
- Vacuum lint and any nest material from the exposed duct end. Use the wire brush to loosen compacted debris. Do this thoroughly: lint left in the duct can smolder.
- Inspect the duct collar stub that protrudes from the wall. If it is kinked, corroded, or has loose screws into the duct behind it, repair or replace those connections with foil-backed duct tape before fitting the new cap.
- Slide the new guard's collar into or over the duct stub, depending on whether it is an inner-sleeve or outer-sleeve design. The collar should fit snugly with no gaps greater than 1/8 inch.
- Hold the guard flange flat against the wall surface. Check that the flange fully covers the old caulk line and any gaps in the siding.
- Drive two sheet-metal screws through the top corners of the flange into the siding (and sheathing behind it if possible). Check that the guard is level, then add screws at the bottom corners.
- Run a continuous bead of exterior silicone caulk around the entire perimeter of the flange where it meets the siding. Smooth it with a wet finger. This seal prevents water infiltration behind the flange.
- Test the damper by hand: it should swing fully open with light pressure and close under its own weight or spring tension. If it sticks, the hinge may be misaligned or the collar may be slightly ovalized. Correct before finishing.
- Reconnect the dryer, run a short cycle, and go outside to confirm the damper opens and exhaust is visible at the termination.
Hooded through-wall vent (rectangular or round box type)
- These caps have a larger housing that extends out from the wall and a downward-facing outlet protected by a hood. Removal is the same as for a standard cap: cut caulk, remove screws, pull out.
- Clean the duct end thoroughly as described above.
- Check that the new guard's internal duct collar matches your duct diameter. Hooded caps for dryer exhaust are most commonly 4-inch round collar with a rectangular external housing approximately 5 to 6 inches wide.
- Insert the collar into the duct stub. On stud-framed walls you may need to apply a small amount of foil duct tape at the collar-to-duct joint inside the wall to ensure an airtight connection.
- Fasten the flange with sheet-metal screws at all four corners, then caulk the perimeter.
- Confirm the damper inside the hood housing moves freely. On hooded caps the damper is often recessed inside the housing; use a flashlight to verify it swings to the full-open position.
- Run the dryer and confirm airflow exits at the bottom of the hood. Exhaust should not back-flow toward the wall surface.
Roof or soffit vent termination
- Roof and soffit terminations require extra care because the installation surface is not vertical. Work on a stable ladder or scaffold. Never work on a wet roof surface.
- Remove the old cap by unscrewing the flange fasteners. Roof caps are typically screwed through the flange into roof sheathing, then sealed with roofing cement or compatible flashing around the base. Cut through old sealant carefully to avoid enlarging the roof opening.
- Use a roof-rated dryer vent cap with a built-in back-draft damper. Confirm the product is rated for roof installation and is metal (aluminum or galvanized steel), not plastic, which deteriorates rapidly under UV and heat on a dark roof surface.
- Clean the duct as described. Roof duct runs often have more horizontal sections that trap lint; use the vacuum attachment as far into the run as possible.
- Slide the new cap collar down into the roof opening over the duct stub. The flange should sit flat on the roof surface.
- Apply roofing cement or the sealant specified by the cap manufacturer under and over the flange edges. On shingled roofs, slide the upper portion of the flange under the overlapping shingles; seal the lower and side edges on top of the lower shingles.
- Fasten through the flange into roof sheathing using roofing screws or the fasteners supplied. Do not skip fasteners on the downslope edge of the flange.
- Test the damper and run the dryer to confirm exhaust exits the cap correctly.
Flexible duct termination (crawlspaces, utility rooms exiting through rim joists)
- If the dryer exhausts through flexible duct, confirm the duct type first. Plastic or thin-foil accordion duct is a fire hazard and prohibited by most manufacturers and codes for dryer exhaust. Replace it with rigid aluminum duct or at minimum a UL-listed semi-rigid aluminum flex duct before adding a guard.
- The exterior termination for a rim-joist or crawlspace exit is usually a short collar stub through the foundation wall or rim joist with a cap on the exterior. Remove and replace the cap using the standard wall-cap procedure above.
- At the interior end of the collar stub, ensure the flex duct is connected with a clamp (not sheet-metal screws, which protrude into the duct interior and snag lint). Foil-backed duct tape may be used in addition to the clamp at joints.
- Keep the flex duct as straight and short as possible. Sags and kinks trap lint and restrict airflow. Support the duct every 4 feet if the run is horizontal.
- Install the same style of guard (hooded cap with hinged damper) on the exterior collar as you would for a standard wall installation.
Dealing with active nests before you install
If you find an active nest with eggs or chicks inside the duct, do not seal the vent immediately. Many native birds in the U.S. are protected under the Migratory Bird Treaty Act, and disturbing an active nest can carry legal penalties. House sparrows and European starlings are not protected under the MBTA, but the safest approach in all cases is to wait until the young have fledged (typically 2 to 4 weeks from hatching), then remove the nest material completely and install the new guard. If you are uncertain about the species or the nest status, consult a licensed nuisance wildlife professional. They can remove nests lawfully and advise on timing. Once the duct is clear and clean, the new guard prevents re-entry.
Troubleshooting common problems after installation
Poor airflow or longer drying times
If drying times increase noticeably after fitting the new guard, the guard is adding more pressure drop than the old cap. Check that the damper swings fully open during operation by watching it from outside while the dryer runs. If it only partially opens, the spring tension may be too stiff for your dryer's exhaust pressure, especially on long duct runs. Try a model with a lighter damper, or confirm the total equivalent duct length does not exceed the manufacturer's maximum for your cap type. On runs over 35 feet, a powered inline booster fan may be necessary, per DOE guidance, to maintain adequate airflow.
Lint accumulating at or in the guard
Some lint deposit on the interior of the damper housing is normal. What is not normal is lint visibly clogging the guard opening or accumulating outside on the wall below it. This usually indicates that the lint trap inside the dryer is not being cleaned every cycle, or that the duct itself has a buildup from months or years of operation. Run the dryer with a load of laundry and watch the cap: you should see a clear exhaust plume and the damper should be fully open. If the damper is flapping erratically or lint is being pushed out in clumps, clean the full duct run from dryer to exterior with a duct-cleaning brush kit before assuming the guard is at fault.
Animals still getting in
If birds or rodents breach the new guard within a few weeks, check three things: the caulk seal around the flange (gaps let small rodents push past the flange edge), the damper itself (dampers can be held open by a twig or pebble that a bird dropped into the housing), and the duct joint inside the wall (rodents enter duct systems through unsealed joints in the wall cavity, not just through the cap). Reinforce the caulk line, clear any debris from the damper, and tape all duct joints inside the wall with foil-backed duct tape. If rodent pressure is very high, a one-way spring-loaded pest-proof cap with a tighter damper seal provides better resistance than a standard gravity-flap model.
Maintenance schedule to keep the guard working
- Every load: clean the dryer lint trap inside the machine. This reduces lint reaching the duct and guard significantly.
- Every 3 months: visually inspect the exterior guard from ground level. Check that the damper is not visibly stuck open or closed and that the caulk line is intact.
- Every 6 months (or seasonally, spring and fall): brush or vacuum the duct from the exterior guard end. Use a flexible duct brush kit to clear lint from the full run. This is the most effective single action to reduce fire risk.
- Annually: remove the guard flange from the wall, clean all lint from the housing interior and damper pivot, inspect the caulk for cracking or separation, and re-caulk if needed. Inspect the duct collar stub for corrosion or loose joints.
- After any suspected nest activity: remove and clean the full duct before running the dryer again. Even a partial nest can restrict airflow enough to cause overheating.
What the installation costs
A quality dryer vent bird guard for a standard 4-inch wall installation runs roughly $15 to $60 for the hardware, depending on material (aluminum vs. stainless steel) and design (basic louvered cap vs. heavy-duty one-way pest-proof model). Stainless steel premium guards top out around $50 to $80. If you already have the basic tools listed above, total DIY cost including caulk and screws stays under $100 in almost all cases.
Professional installation by an HVAC technician or dryer vent cleaning service typically runs $75 to $200, including the cap hardware, labor, and usually a full duct cleaning. If your duct run needs to be cleaned, joints resealed, or rigid duct sections replaced, factor in an additional $100 to $300 for the duct work itself. Roof or soffit installations cost more due to ladder access and waterproofing work.
Hire a professional if: your vent exits through a roof (fall hazard and waterproofing complexity), your duct run exceeds 25 feet or has more than two elbows (airflow calculation needed), you find extensive nest material deep in the duct you cannot reach with a brush kit, or your dryer is already showing signs of restricted exhaust such as very long drying times or heat shutoff trips. An HVAC pro can also confirm whether your installation is code-compliant before any issues arise.
Short shopping checklist for common scenarios
| Scenario | Guard Type to Buy | Material Recommendation | Key Spec to Confirm | Approximate Cost (parts only) |
|---|---|---|---|---|
| Standard 4-inch wall cap, low pest pressure | Hooded wall cap with hinged gravity damper | Aluminum or galvanized steel | 4-inch collar, free area ≥12.5 in² | $15–$35 |
| Standard 4-inch wall cap, high pest pressure (active nesting history) | One-way spring-loaded or magnetic pest-proof cap | Stainless steel or heavy-gauge aluminum | 4-inch collar, damper seals tight when closed, free area ≥12.5 in² when open | $35–$80 |
| Roof or soffit exit | Roof-rated dryer vent cap with built-in damper | Aluminum (never plastic for roof) | 4-inch collar, roof flashing included, rated for horizontal or vertical roof install | $25–$60 |
| Older home with 3-inch or 3.25-inch duct | Hooded wall cap sized to match | Aluminum | Confirm 3-inch or 3.25-inch collar size; harder to find, may require duct adapter | $20–$40 |
| Retrofit: existing cap still good, just adding pest exclusion | Replacement damper insert or pest-proof flap kit (some brands offer drop-in upgrades) | Stainless or aluminum | Must fit inside existing cap housing without reducing free area | $10–$30 |
| Long duct run (>35 ft) already near manufacturer limit | Lowest-resistance hooded cap available, possibly with inline booster fan | Aluminum or galvanized steel | Check manufacturer's pressure-drop datasheet; pick lowest static-pressure cap | $30–$60 for cap; $80–$150 for booster fan |
Related bird-proofing solutions worth knowing
Dryer vents are one of the most common but often overlooked entry points for birds and rodents on a house exterior. Other ventilation openings, including bathroom exhaust vents, range hood vents, and attic soffit vents, can be addressed with similar exclusion products and the same decision criteria. If pest pressure is high across your whole property, a broader exclusion audit is worth doing rather than addressing one vent at a time. Physical barriers combined with habitat modification (reducing nesting material nearby, trimming overhanging branches) give the best long-term results.
If birds are also a problem on your rooftop solar array, the installation approach shares some of the same logic around using physical exclusion rather than deterrents alone. For detailed methods on protecting arrays, see our guide on how to bird proof solar panels (resource id 64d482c1-a7a7-4e93-bdf3-a70033fee6d6). For step-by-step guidance on how to install bird guard on solar panels, see our dedicated guide. Cost is a common concern for any bird-proofing project, and the range varies significantly depending on whether you go DIY or hire a specialist. For cost details, see how much to bird proof solar panels. For detailed pricing and typical cost ranges, see how much does bird proofing cost.
FAQ
What is a dryer vent bird guard (bird‑proofing) and why use one?
A dryer vent bird guard is an exclusion device—a durable screen, louvered/hooded cap or purpose‑built termination—that prevents birds, rodents and nests from entering the dryer exhaust opening while allowing exhaust airflow. Reasons to install: prevent nesting that blocks airflow and creates fire risk, avoid animal damage to ducts and soffits, stop pest ingress into walls, reduce odors and rodent/parasite problems, and keep dryer performance efficient.
What are the safety and code considerations before adding a bird guard?
Key safety/code points: dryer exhaust must terminate outdoors and maintain required free area (IRC M1502). IRC/model codes and many manufacturers explicitly prohibit small‑mesh screens or grille‑type terminations that reduce opening area or trap lint. Back‑draft dampers are required/strongly recommended. Using guards that materially reduce airflow or collect lint can increase dryer temperature and fire risk. Always check local building code and your dryer manufacturer's venting instructions before modifying terminations.
How do I choose the right guard for my vent? (Decision criteria)
Consider vent type (wall/hood, louvered cap, roof/soffit, flexible duct termination), material (stainless or galvanized steel preferred; heavy‑duty aluminum acceptable; avoid thin plastic cages), mesh size (PNNL recommends 1/2×1/2 in for general bird/rodent exclusion; use 1/4×1/4 in only where mice are a problem and where lint buildup is managed), free‑area and airflow impact (avoid fine mesh directly at termination), lint/fire safety (use open louvers, hinged dampers and mesh placed away from the immediate outlet), corrosion resistance, ease of cleaning/removal, and local code/manufacturer restrictions. If in doubt, choose a hooded cap with integrated damper and removable coarse metal mesh placed beyond the hood outlet or use a one‑way flap designed for dryer exhaust.
What tools and materials will I need? (shopping/checklist)
Tools: adjustable wrench, screwdriver set (Phillips & flat), drill and bits (masonry or wood depending on substrate), tin snips, metal file, caulk gun, ladder, utility knife, tape measure, work gloves, safety glasses. Materials: hooded/vent cap or bird guard rated for dryer use, 4‑inch rigid or semi‑rigid metal duct (if replacing), 4‑inch hose clamps, corrosion‑resistant screws or masonry anchors, exterior‑grade silicone caulk or sealant, coarse stainless/galvanized mesh (1/2×1/2 in) if required, back‑draft damper (if not integrated), butyl tape or foil HVAC tape. Optional: silicone high‑temp sealant, removable inspection plate, pest‑proof collar.
What measurements should I take before buying a guard?
Measure: (1) The dryer exhaust diameter (typically 4 in). (2) Distance from the final duct end to the outer wall/soffit surface. (3) Depth and external projection of the existing hood/cap. (4) Number and angle of elbows/total run length—note manufacturer maximums. (5) Free opening size of the current termination. Use these to select a cap that fits the duct and keeps required free area. Typical measurement table: dryer duct ID = 4 in; recommended minimum external free area = 12.5 in² (per IRC); 1/2×1/2 in mesh free‑area reduction ≈50% (estimate—check product data).
Step‑by‑step: Installing a guard on a louvered (gravity‑flap) wall cap
1) Turn off dryer and disconnect power if moving appliance. 2) From outside, remove existing cap/cover per manufacturer directions. 3) Inspect duct termination and damper—clean lint. 4) If cap is damaged, replace with a hooded wall cap with a spring or hinged damper sized to 4 in. 5) If using mesh, attach a coarse 1/2×1/2 in stainless/galvanized mesh behind the damper (inside the hood), not over the outer face; fasten with screws and seal edges to prevent gaps. 6) Refasten cap to wall with corrosion‑resistant screws/anchors and weather‑seal perimeter with exterior caulk. 7) Test the damper (blow/pull) to ensure it opens freely and measure airflow with a hand‑held anemometer or run a drying cycle for performance check.
Next Article
What Is Bird Proofing: Guide for Homes, Solar & Property
What is bird proofing: practical guide to methods, costs, DIY installs and top product picks for homes, solar, vents, &